
Disclosure: This post contains affiliate links and we may receive a referral fee (at no extra cost to you) if you sign up or purchase products or services mentioned. As an Amazon Associate, I earn from qualifying purchases.
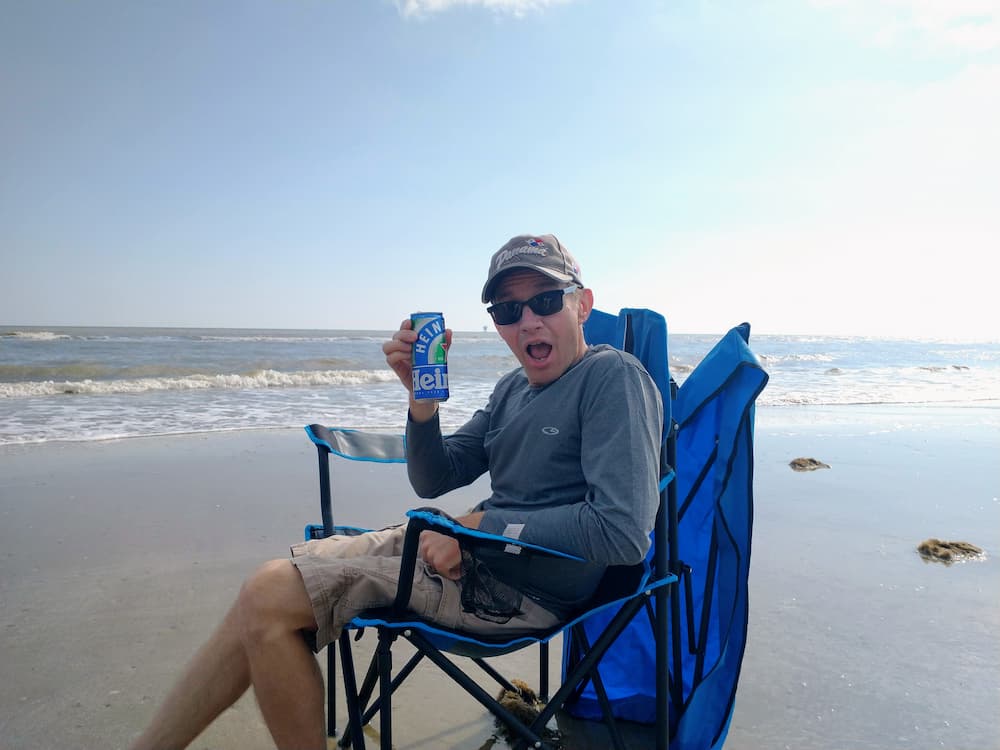
It’s crazy to think that we’re already 4 months into our 9-month RV adventure around the country.
We completed our first loop (of 3 planned) and went from Ohio to Texas and back. We’re now on loop 2 as we head toward the south for a couple of months and then make our way up the east coast when we smell spring getting near. Then we’ll be making a massive trip out west for loop 3 throughout the spring and early summer.
It’s been a heckuva journey so far. You can catch up on things in my last post, Wellness, Wealth, and Wanderlust: Paving the Way for 2024. In The Ups and Downs of RV Life: 45 Days in Our Tiny Home, you can read about the good, the bad, and the ugly.
I’ve wanted to put together a post about everything we bought for our RV adventure since we got rolling with this crazy travel idea. It’s good that I’ve waited until today though because now I can tell you what’s worthwhile and what’s not.
So if you’re getting ready for an RV adventure of your own, you’ve come to the right place!
These are a lot of the things we bought for our 9-month road trip across the country. Your needs might not be identical because it all depends on your RV (ours is a smaller travel trailer) and your trip plans (we’re doing a lot of off-grid boondocking).
Regardless, I’m sure a lot of things on this list could be valuable to you as well. And it might give you ideas for things you hadn’t considered before. Whether you’re new to the RV road trip world or someone who’s been doing this for years, you’ll probably find something useful for your needs here!
Note: I mostly used pictures of our actual products rather than the stock photos so you could get a better feel for them. I tried to find the identical product for the links but in some cases, they weren’t available so I found items that were as close as possible.
This post is a big one, folks, so strap on your seatbelt and let’s go!
Driving, Towing, and Setting Up
Dashcam
I learned that a dashcam is a relatively common item for drivers in most countries except the U.S. I’m not sure why that is but get a dashcam.
You should have one in the car you normally drive just like you should have one in your motorhome or towing vehicle. If there’s ever any question about an accident, this can provide the evidence that makes the difference between “not my fault” and “What do you mean my premium is going up and the guy that hit me is suing me?”
You don’t even need to spend a lot if you don’t want to. While I spent about $160 for everything on our regular car at home for this one, I just wanted something basic this time around and spent about $10 on it from Temu. The cheap one is less fancy but it does the job nonetheless.
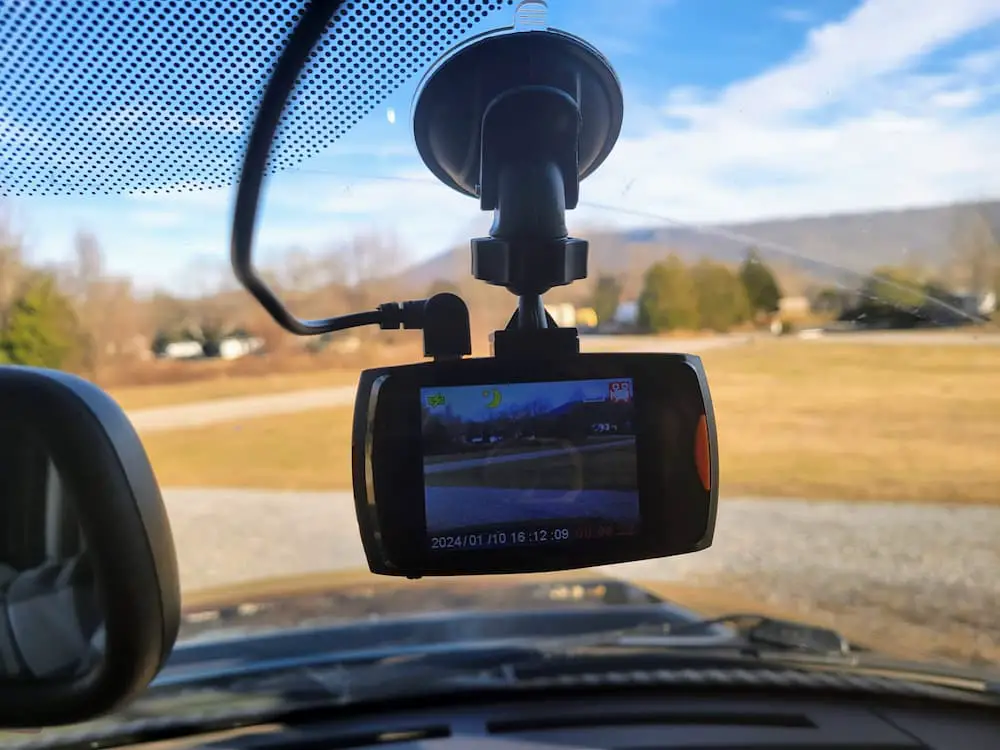
Amazon Link: VIOFO Dual Dash Cam A129 Plus Duo (The nice one I use in our Honda Pilot)
Temu Link: Cheap Dashcam (The one I used in our Ford Expedition)
Back-Up Camera
Ok, I have to say, I’ve failed twice on this mission, but it’s something I still thought is worth mentioning. My Jayco RV trailer is already wired for a particular camera system. I bought a knock-off system that works with an adapter for this. Everything was working perfectly and then it suddenly stopped playing nice… such is life.
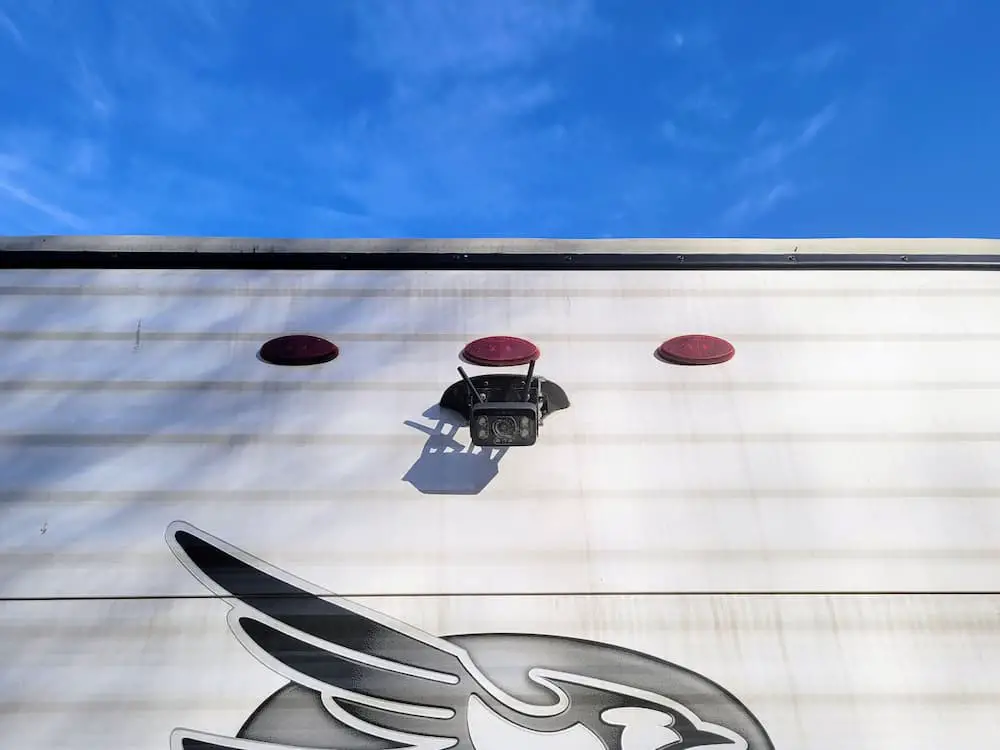
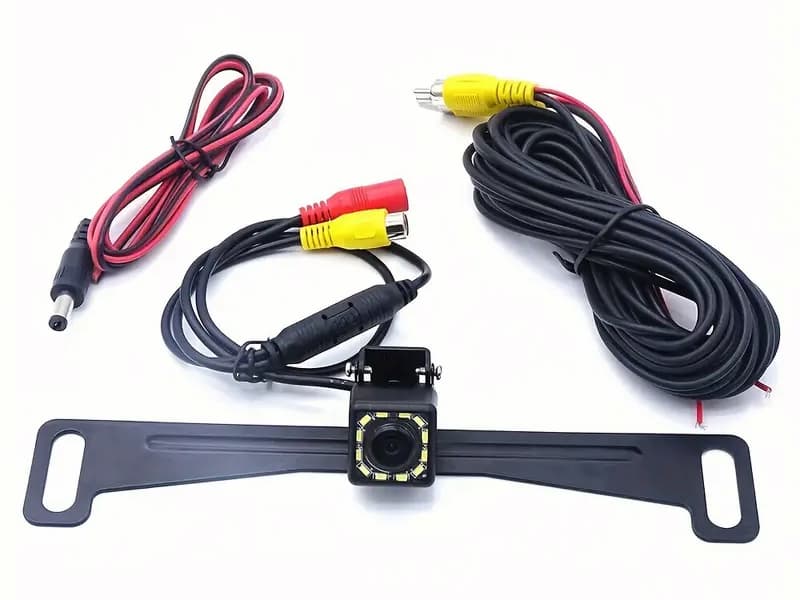
Then I bought a license plate backup camera for our 2012 Ford Expedition tow vehicle that doesn’t have one built in.
The plan was to install it and run the wires up to connect to the Kenwood stereo we already have with Android Auto (the backup camera can plug right in). However, I didn’t even think about the license plate being on the tailgate. To do this, I would need to run it from the license plate up the tailgate, all the way back down to the reverse lights, and then I could run it up to the stereo.
This is out of my wheelhouse and not something I was willing to pay to have done since we’re going to sell the car at the end of this trip anyway. So that was failure #2. Lisa now guides me while backing up the trailer or backing the truck up to the trailer to hitch it so we’re getting by fine without it.
I’m 0 for 2 on this but I still think it’s worth at least considering if it makes sense for your RV adventure. Weigh the pros and the cons and decide for yourself what makes sense.
Amazon Link: DoHonest RV Trailer Backup Camera System
Amazon Link: License Plate Backup Camera
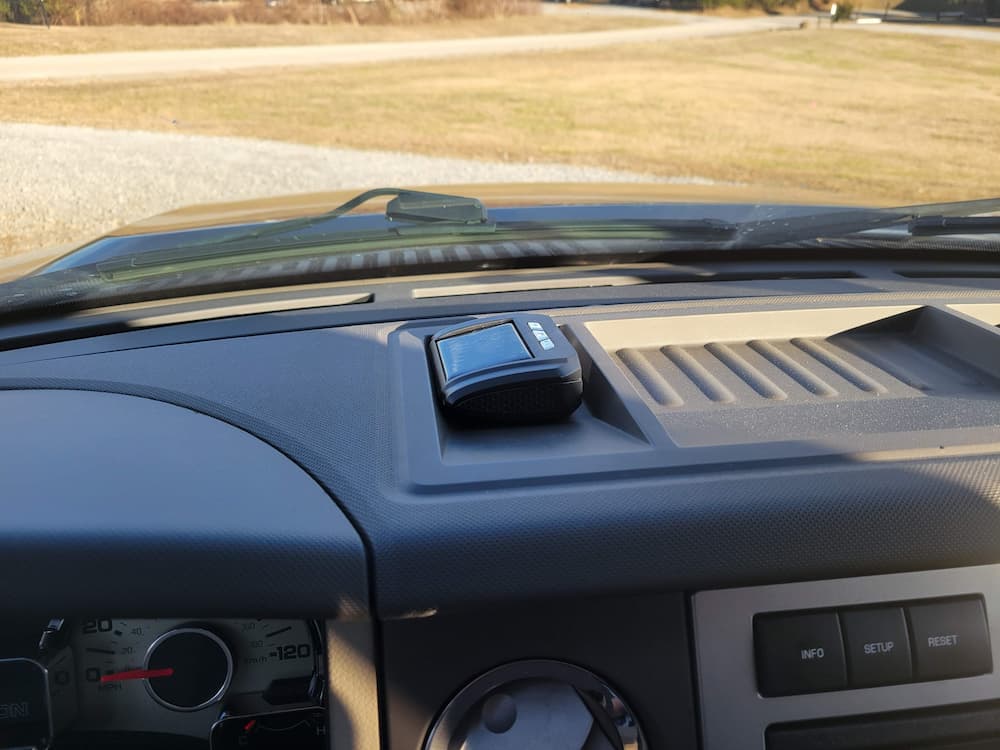
Tire Pressure Monitoring System (TPMS)
Tires are critical on any big road trip. I don’t want to suggest that you shouldn’t be checking your tires constantly. I physically look at the tires as part of my checklist before we leave a campsite. Some people check them over every time they get gas. It’s that important.
But I also believe a second set of “eyes” is good to have. For tires, a tire pressure monitoring system (TPMS) can be that second look.
I bought a set of 6 TPMS tire stem caps that monitor the 4 tires on our Expedition and the 2 on our Jayco RV and report back wirelessly to a small dash unit. You can set alerts on low pressure, high pressure, temperature, and more. The unit is solar-powered, too, so I can just leave it on the dash and it continuously charges itself.
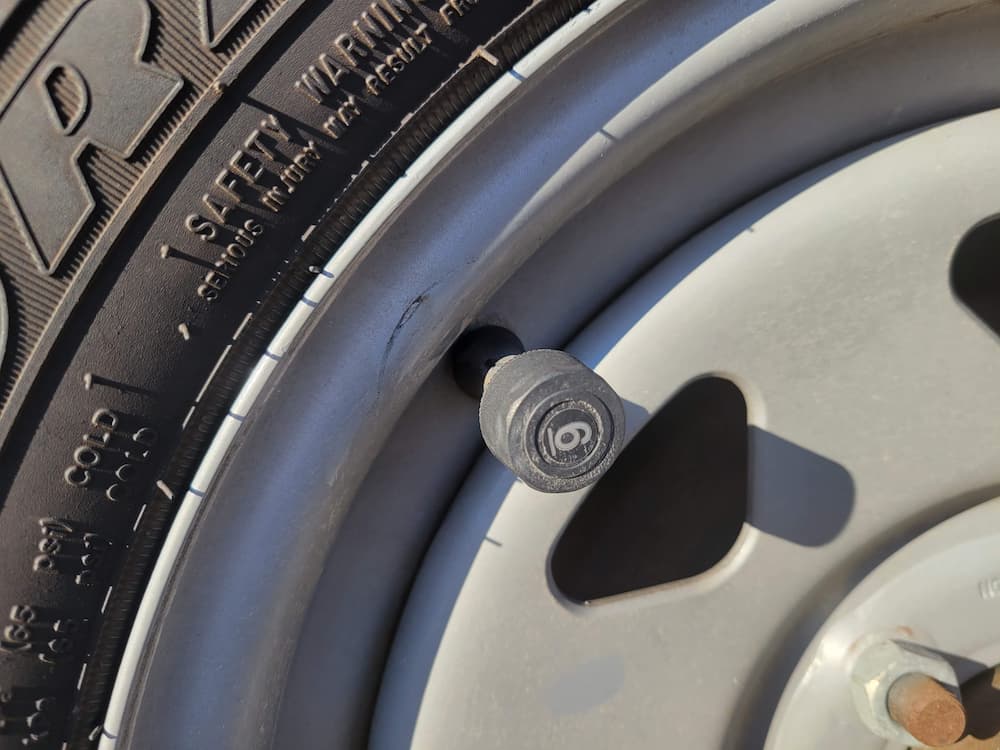
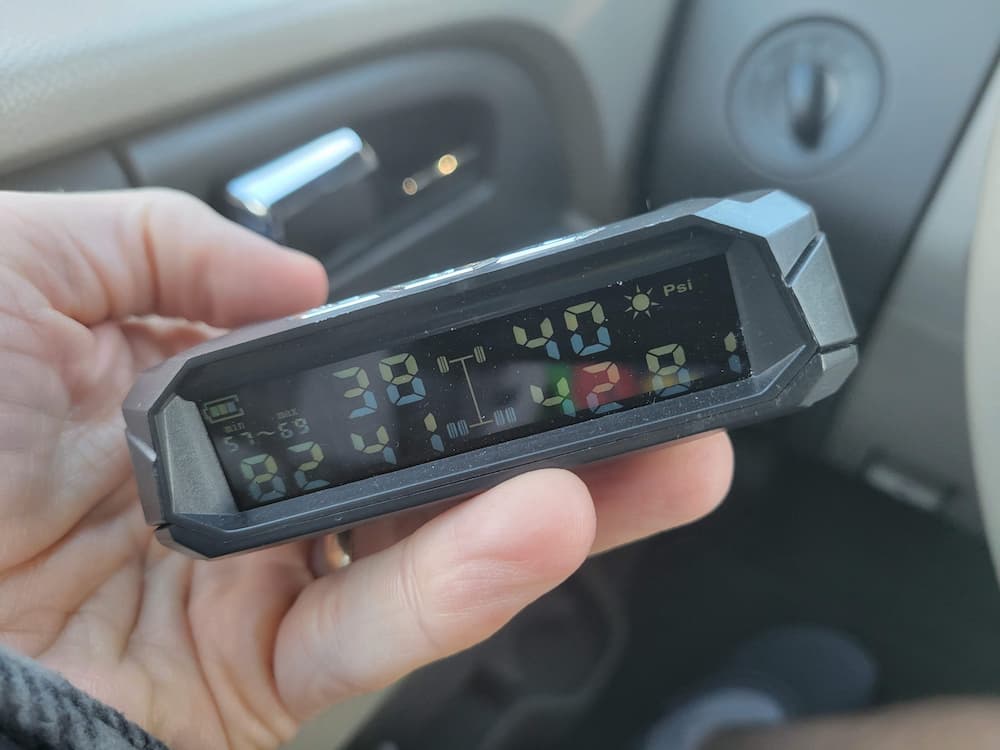
This has helped me catch low tire pressure on a couple of tires and high pressure on a couple of tires. This is well worth the money to have.
Amazon Link: Tire Pressure Monitoring System (TPMS)
Compressor
If your tires are low, how do you fill them? Well, if you’re near a gas station, maybe that’s an option. Otherwise, if you’re in the middle of nowhere, yikes.
Many folks in big motorhomes carry monster-sized compressors. That’s not an option for us since we don’t have a lot of space. I went with a smaller compressor that’s still capable of inflating our trailer’s tires. It can plug into the cigarette lighter of our truck or the DC port in our trailer. I’ve used it a couple of times already and it handles the job nicely.
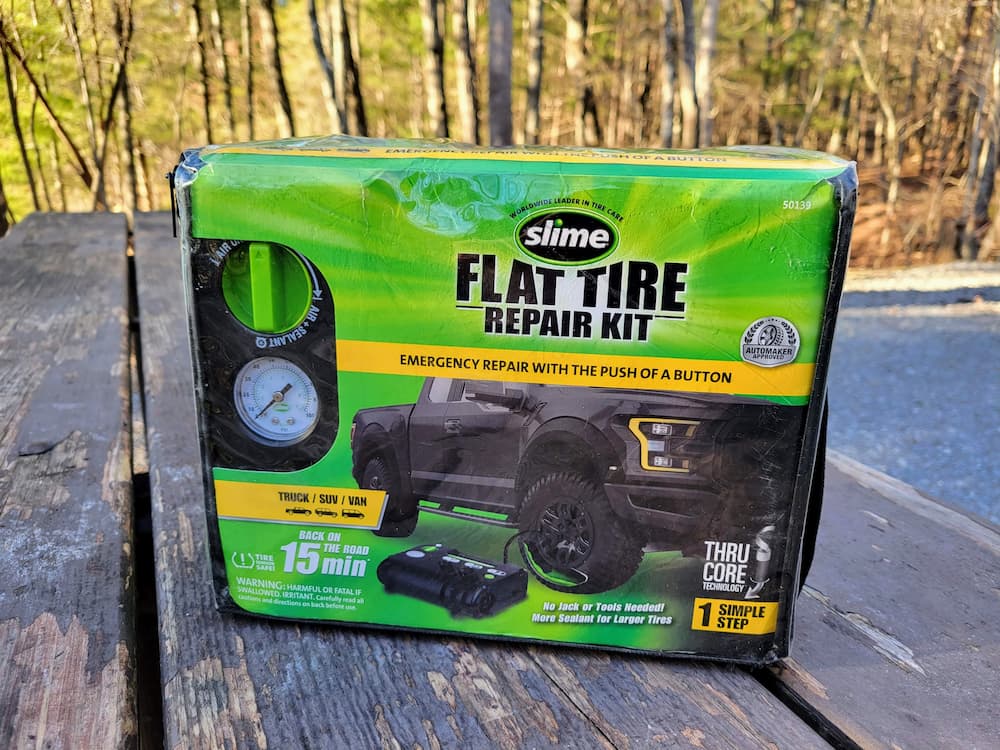
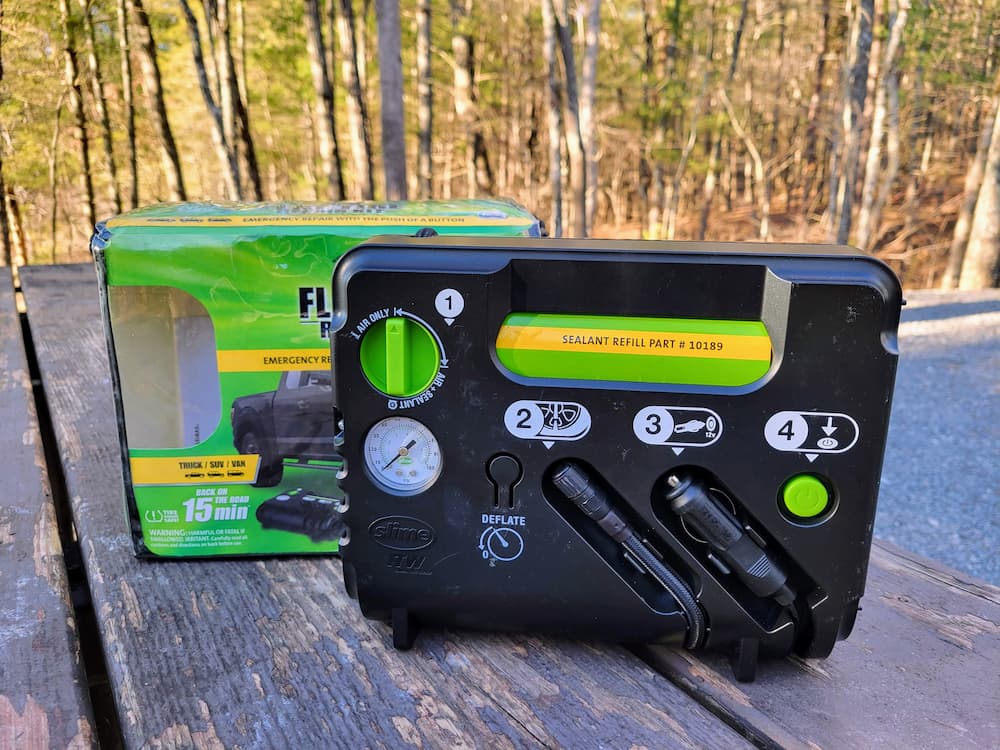
I also decided on the Slime model since it has the “slime” you can fill the tire with to help seal a small hole, similar to Fix-A-Flat. Yes, I know changing a tire off the rim filled with this stuff ruins a mechanic’s day, but it’s still good to have as our last option.
Amazon Link: Slime Compressor and Flat Tire Repair Kit
Backseat Caddy
While brainstorming all the things for this list, our daughter, Faith, mentioned that the backseat caddies she has are wonderful. She likes that she can have all her stuff organized and out of the way while we’re driving.
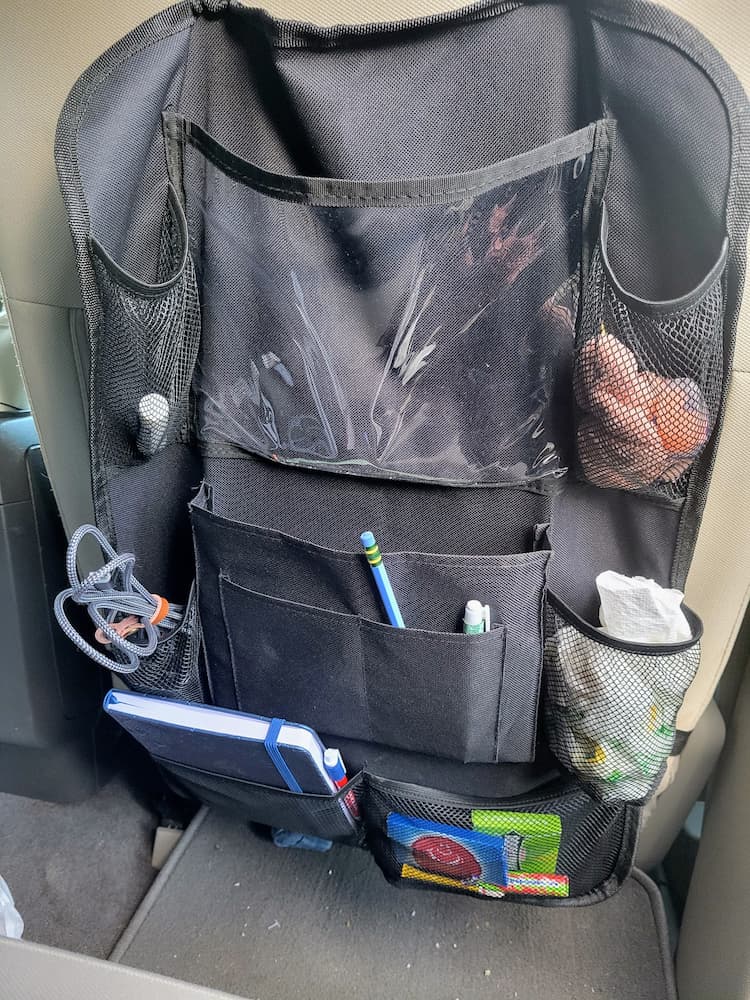

They just clip around the headrest of the front seat as well as around the seat (which gets tucked into the seat crack). It’s the little things in life, folks!
Amazon Link: Backseat Organizer
Road Flares or Reflective Warning Signs
If you happen to break down somewhere, you’ll be glad you have ’em. ‘Nuff said. I bought folding triangle reflective warning signs that pack away nicely until needed.
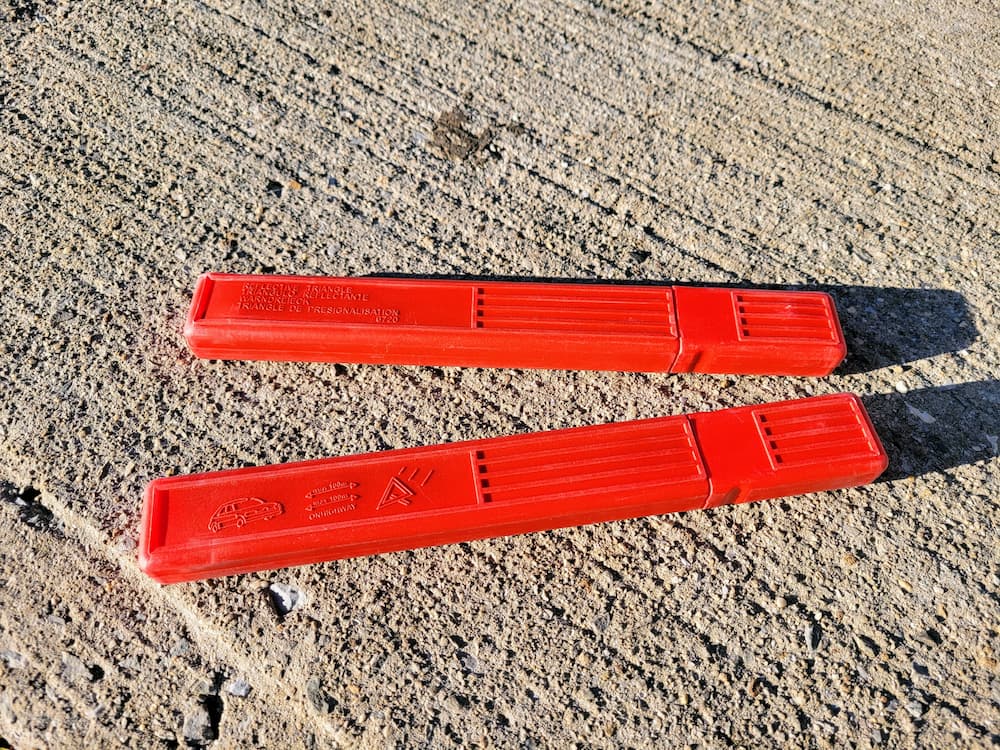
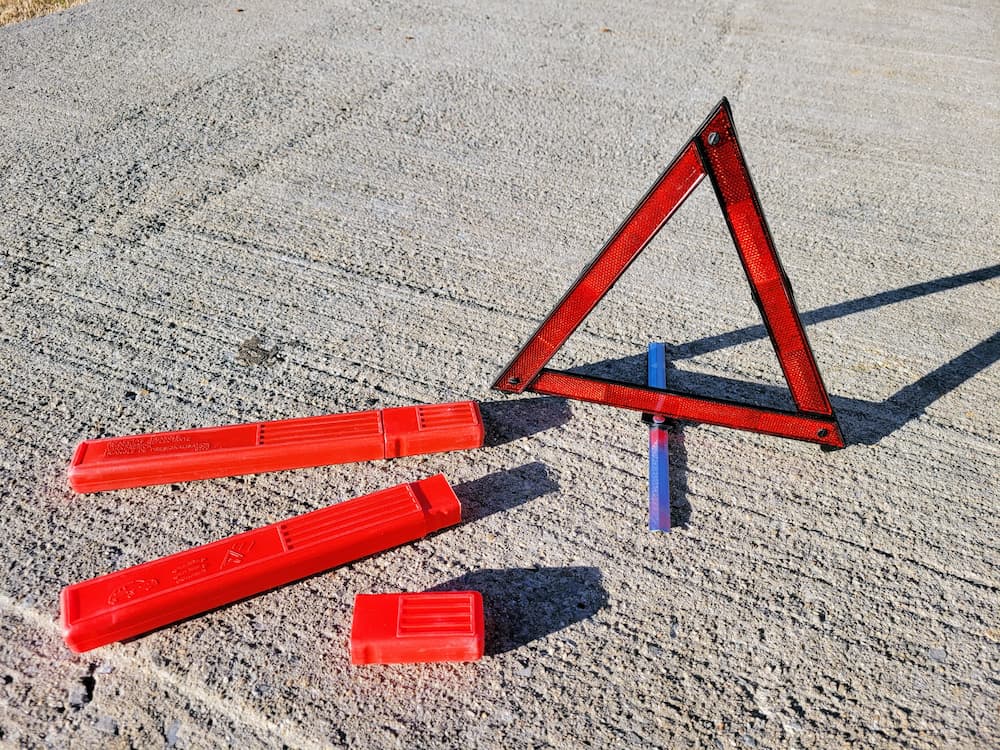
Amazon Link: Emergency Reflective Warning Triangles
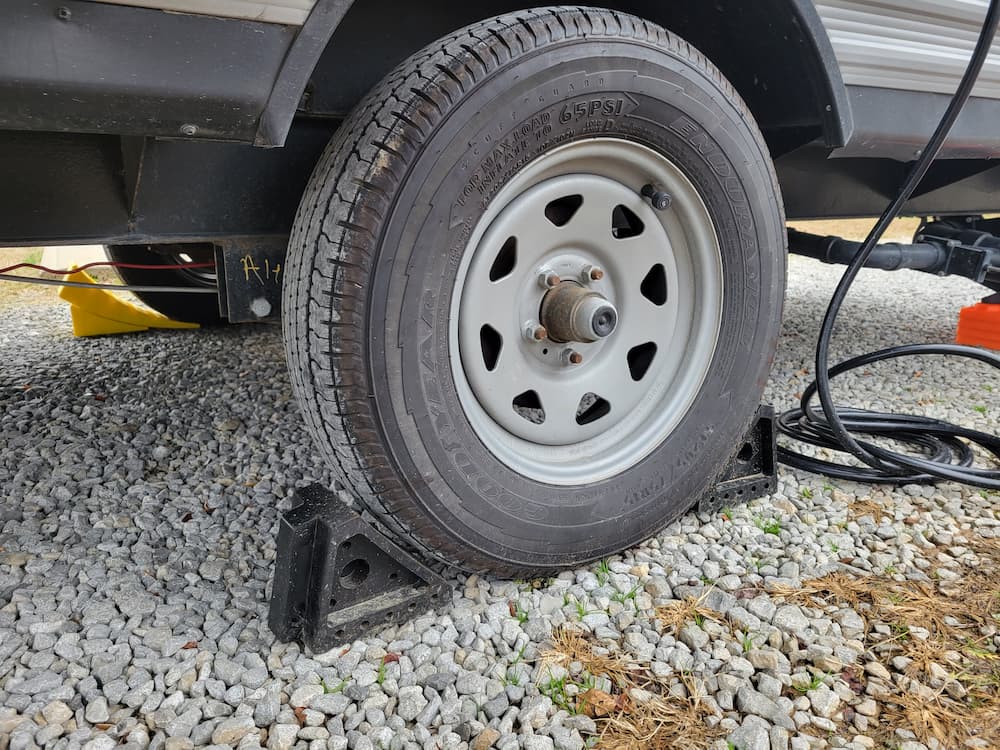
Camper Levelers
When setting up, you level the RV trailer from side to side and then from front to back. In our case, the front-to-back part is done later after we unhitch by raising or lowering the tongue jack.
To level from side to side though, we use camper levelers. The ones generally talked about are Anderson levelers (maybe they were the first?), but now there are so many options out there that work well.
To use them, Faith puts a level in the trailer to check which side is higher. Then she takes one of the levelers and puts it under the tire on the lower side. I’ll then pull forward like driving up a small ramp while she checks the level until she tells me to stop. Then she pops in a wedge on the other side (if we’re far enough on it) to lock it in. Done… easy peasy.
Much easier than using blocks and building up to what you need because the levelers can go in much smaller increments. Not as easy as something like LevelMatePRO+ or Beech Lane’s system, but much cheaper for sure!
Amazon Link: RV Camper Levelers (like I’m using)
Amazon Link: LevelMatePro+
Amazon Link: Beech Lane Wireless RV Leveling System
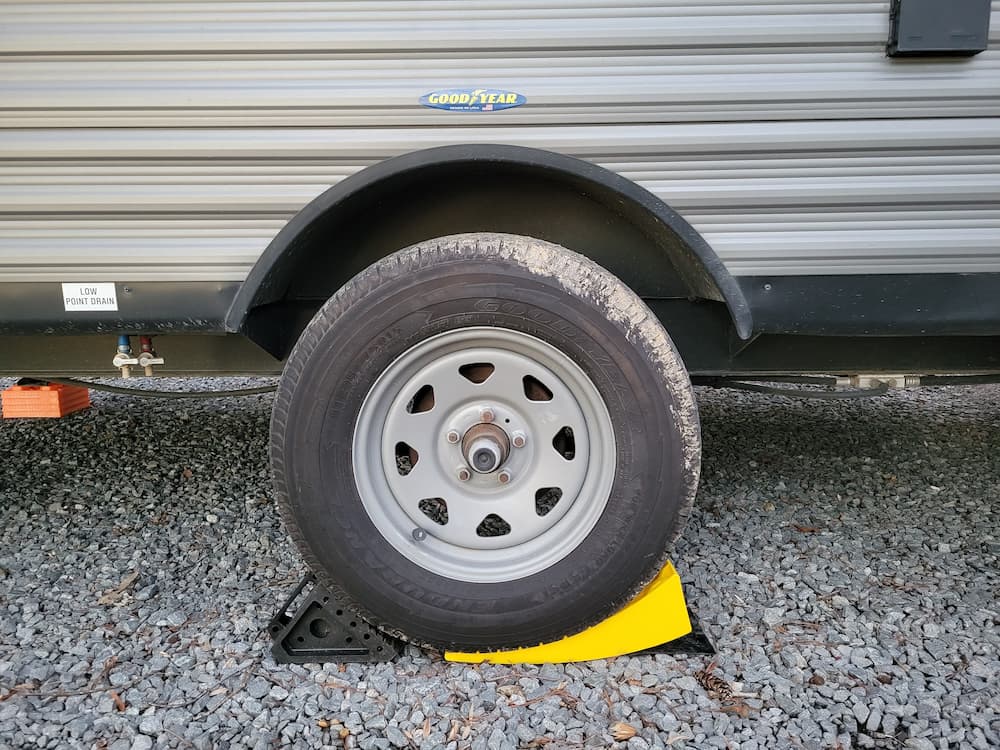
Chocks
After the levelers are in place, we drop chocks around any wheel that needs ’em to keep the RV from rolling anywhere. There are plastic ones, but we prefer the solid rubber ones. You might want to check at Harbor Freight for these, too.
Amazon Link: Heavy Duty Rubber Chocks
Leveling Blocks for Stabilizers and Tongue Jack
We don’t use leveling blocks to level the trailer but we do use them underneath the scissor stabilizers and sometimes under the foot of the tongue jack (sometimes we use wood blocks under the tongue jack).
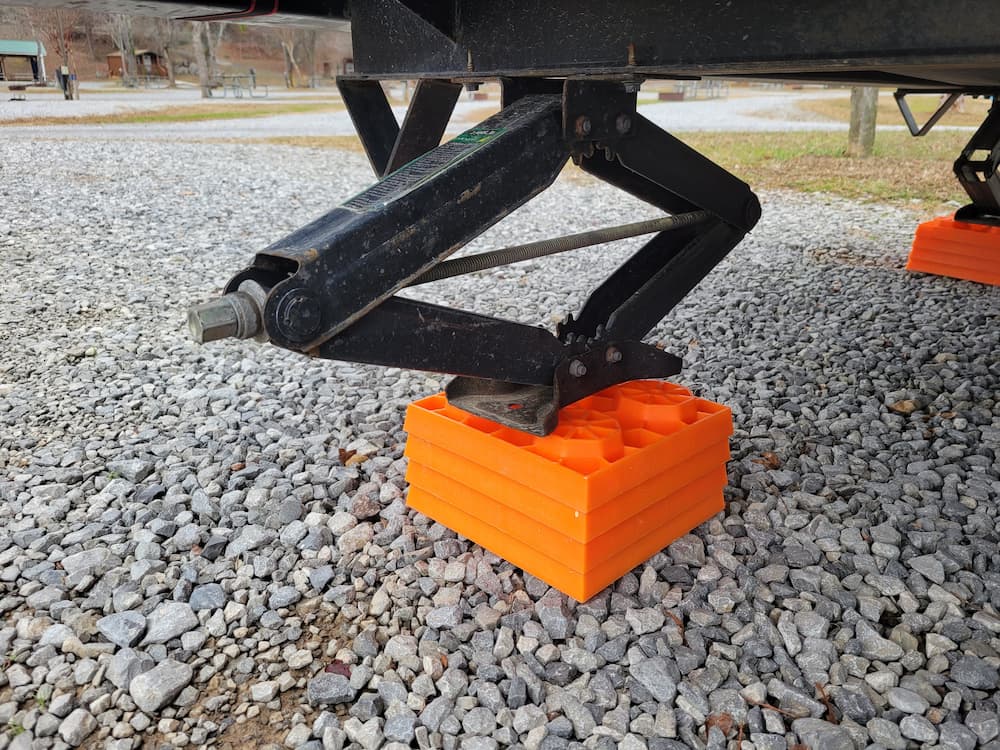
It’s nice because you can get a 10-pack and then just stack what you need. Remember, don’t jack up the RV with the scissor stabilizers – that’s not what they’re for. Lower the stabilizers until they touch and then turn it until it’s tight and no more.
Amazon Link: 10-Pack Leveling Blocks
Trailer Hitch Locks
Any trailer hitch lock can be broken or pried off if a criminal wants it bad enough. Your goal is simply to make it enough of a hindrance on your RV adventure that the criminal doesn’t think it’s worth the hassle and will move on (probably to someone else’s RV who didn’t take precautions).
First off, I take the hitch off the back of our Expedition and store it away every time we disconnect. It would get in the way otherwise, plus it’s just something else a criminal might be interested in.
As far as the trailer goes, I use two different locks each time:
- A coupler lock
- A latch pinhole lock
The coupler lock I use (from Master Lock) locks in where the ball from a hitch would go and blocks access to it. The lock I use for the latch pinhole screws into place with the key preventing anyone from opening the latch handle. Here are both locks on my trailer hitch…

Again, neither is perfect and a boot could be another option, but this is what we’re doing.
Amazon Link: Master Lock Coupler Lock
Amazon Link: Latch Pinhole Couple Lock
Amazon Link: Wheel Clamp Lock (Boot)
Power and Energy
LiFePO4 Lithium Iron Battery
This was a big one for us. The standard 12-volt 100-amp lead acid battery that came with our RV travel trailer wasn’t going to cut the mustard.
When you’re boondocking (dry camping off-grid), you aren’t plugged into shore power at an RV park so that battery would deplete pretty quickly. Throw in that you should never let a lead acid battery drop below 50% charge or risk damaging it, that battery doesn’t get you far.
Outside of charging it in other ways (we’ll talk about that momentarily), your options are to either add more lead-acid batteries or upgrade to lithium. Lead acid batteries are cheap but they have that 50% limit, they’re heavy, they charge slowly, they discharge quickly while not in use, and they need ventilation.
Lithium batteries squash almost all those cons:
- You can deplete them down to zero (or close to it)
- They’re a heckuva lot lighter
- They charge faster
- They barely discharge at all while not in use
- They don’t need ventilation
Not bad, right? The only big con? They’re more expensive. Sometimes, they’re a lot more expensive. And if you buy the big names like Battle Born, you’ll pay a ridiculous amount of money.
We took a chance on a cheaper battery – the CHINS 12V 100AH LiFePO4 Lithium Iron Battery with BMS for RVs. It was around $250 at the time. We decided it was worth the $250 risk if it didn’t work well.
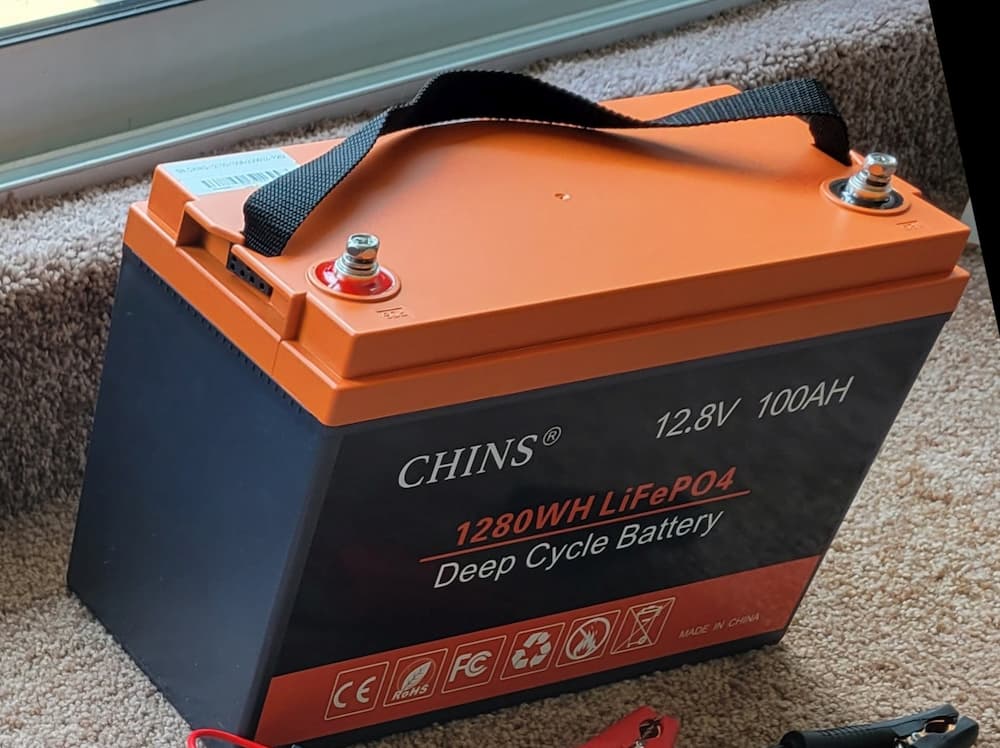
Not only has it worked great, but we’ve not added a second one in the mix to run in parallel and give us even more juice before needing to charge up!
Walmart Link: CHINS 12V 100AH LiFePO4 Lithium Iron Battery
Amazon Link: CHINS 12V 100AH LiFePO4 Lithium Iron Battery
Amazon Link: 2 AWG Battery Cables
Battery Monitor
The battery monitor that comes standard in most RV’s isn’t great. Seeing that it has roughly 1/3 capacity left leaves out the details that might be important. I picked up a battery monitor for cheap that just connects directly to the battery. It gives me information on exactly how much capacity is left, the voltage it’s currently outputting, and the battery temperature.
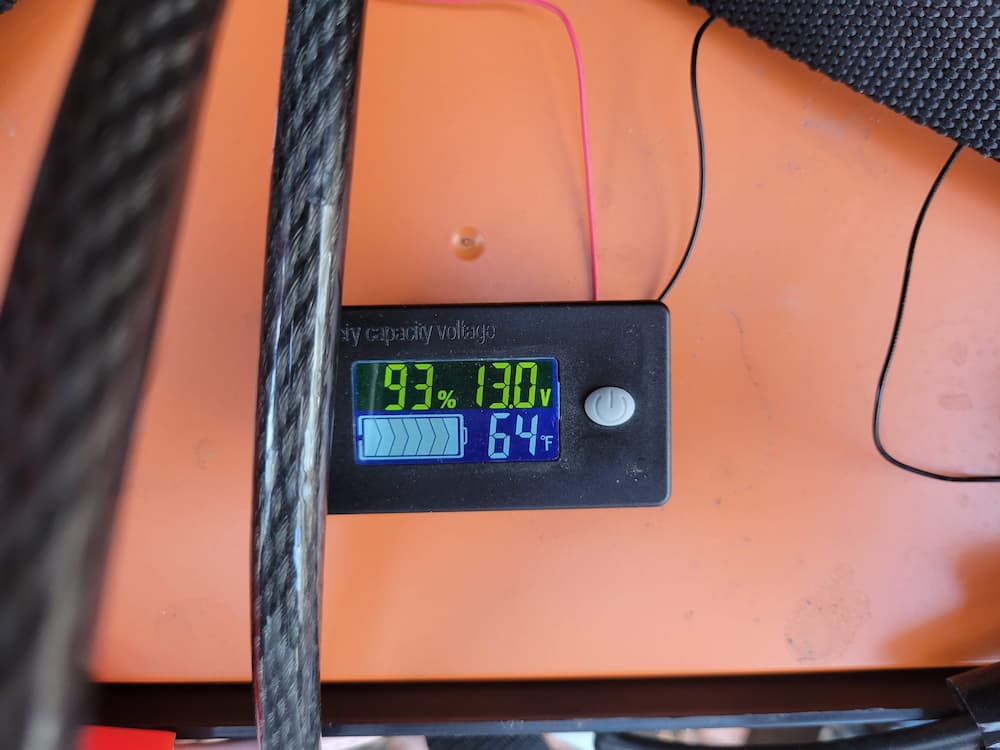
There are monitors that you buy that can connect to via Bluetooth, give more detailed info, or provide alerts when there’s a problem. I didn’t need all that so this small one was good for what I wanted.
Amazon Link: Battery Capacity Monitor
Solar Panel Briefcase
Even with two good lithium batteries, we still need to charge them. When we’re at an RV park, connecting to shore power handles that with no problem. But for longer stints of off-grid boondocking, we need other ways to charge the batteries.
We decided not to go with solar on the roof for multiple reasons:
- We don’t have a big travel trailer so there’s less surface area to put them on
- It’s expensive to install the panels and integrate them into the RV system
- We plan to sell the trailer after this RV adventure so the cost versus the value we’ll get from the installation likely wouldn’t add up
- If you’re parked in the shade, you’re not going to be getting much solar power coming in
Instead, we went with a good solar briefcase. It’s cheap and easy to use. I put it out when we want it and just use the alligator clips to clip them to the batteries. I can put the panels in the sun even if we’re parked in the shade and I can adjust them throughout the day if I want to get optimal sun.
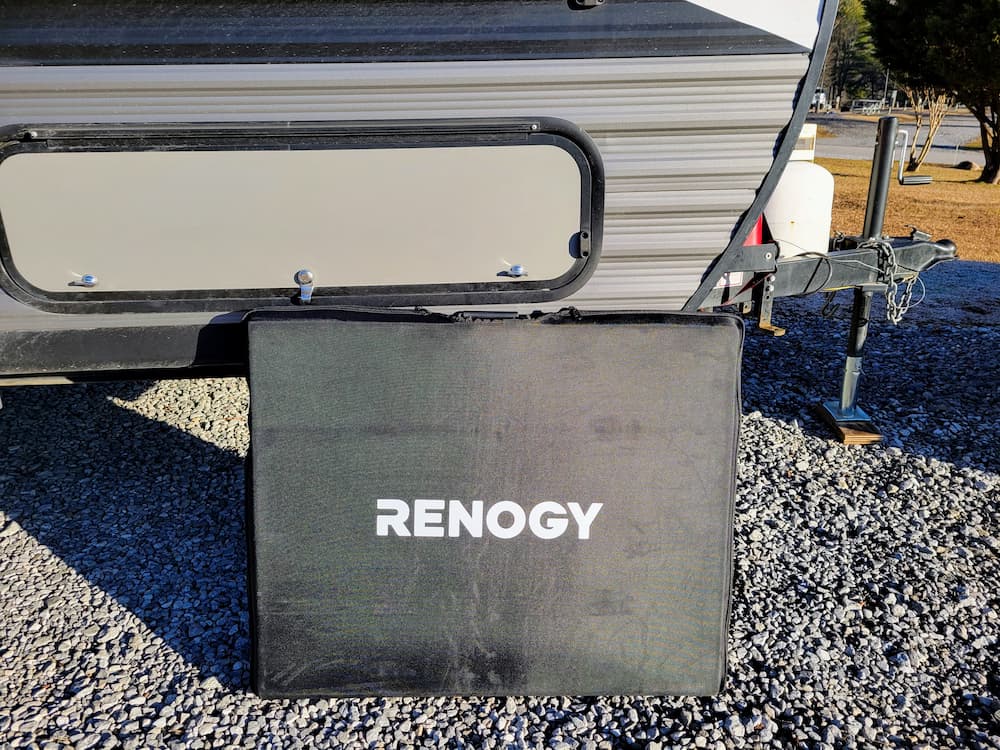
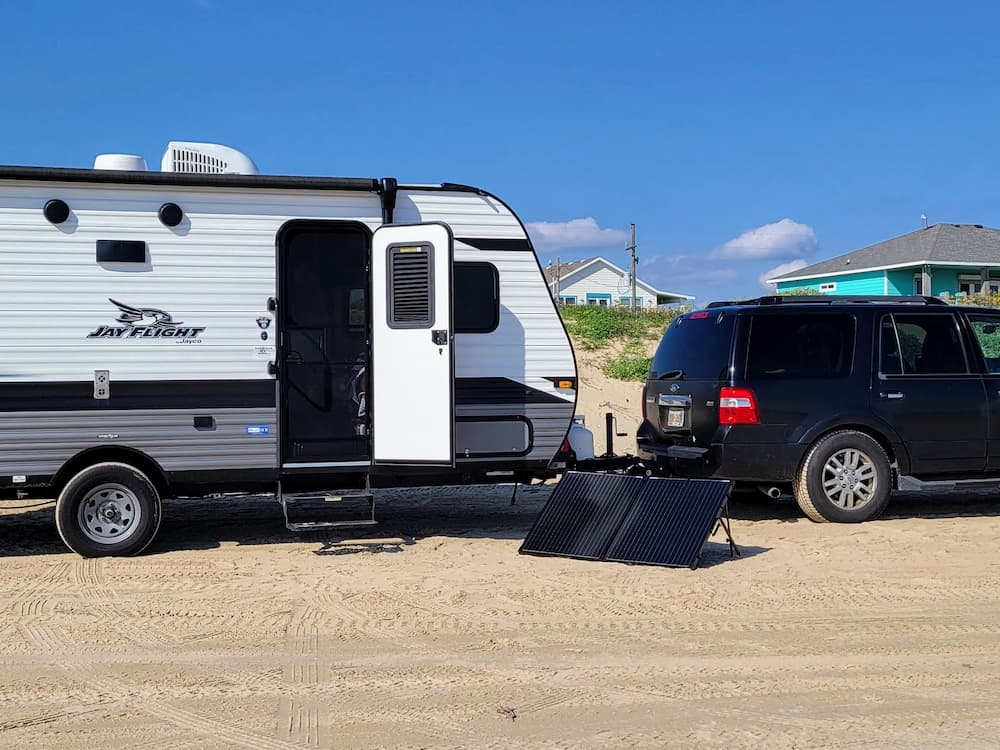
It’s got an integrated solar controller and there’s no muss, no fuss. It even draws a decent amount of power on cloudy days. Best of all, it’s clean and quiet power. A 200-watt briefcase has been working well to top off our batteries as needed. You might need more depending on your battery usage.
This turned out to be a great decision!
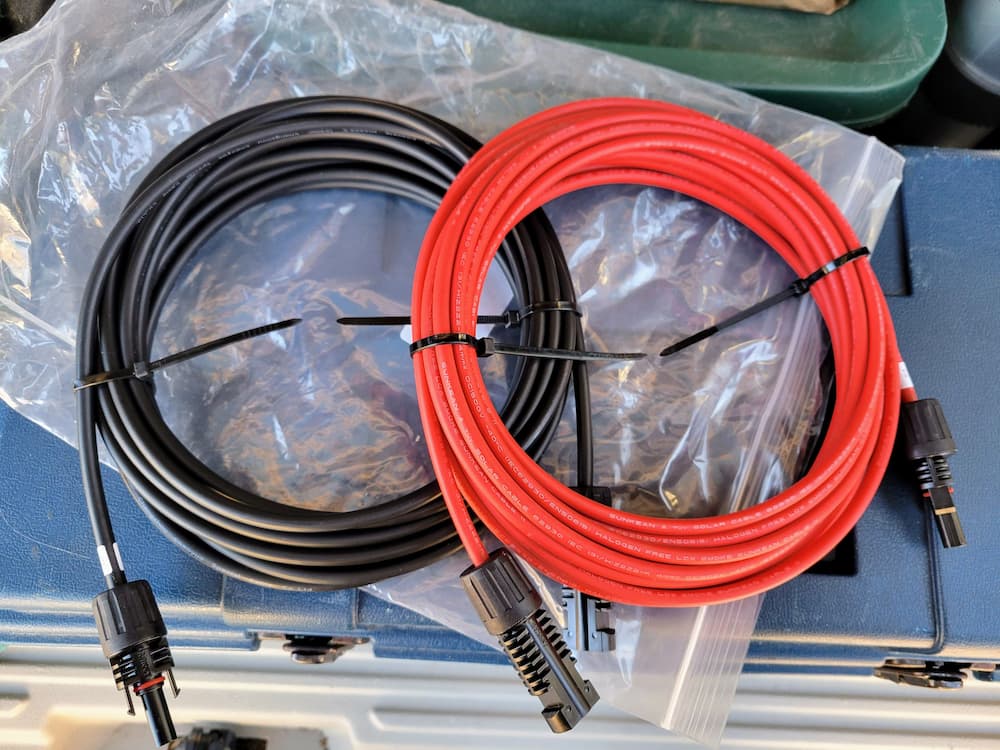
Amazon Link: Renogy 200 Watt 12-Volt Portable Solar Panel Briefcase
Amazon Link: Renogy 20FT 12AWG Solar Panel Extension Cables
Inverter Generator
The solar briefcase has done well for us, but there will be times when the solar just doesn’t cut it. Maybe it’s raining and cloudy for days or we just need a bigger boost for whatever reason. That’s where a generator comes in.
There are a ton of different generator options. A lot of what you might need depends on your power usage.
Regardless, as far as gas generators go, an inverter generator is a better option when possible. It’s clean power that’s better for your electrical equipment and it’s a lot quieter than a regular generator.
The king of the smaller inverted generators is almost always given to the Honda EU2200i. But I didn’t want to spend $1,100 for a generator that we only needed for this one RV adventure.
After a stupid amount of research, I ended up getting the Firman 1600W Running / 2000W Peak Gasoline Powered Inverter Generator through Costco. Not only is it less than half the price (and an even better deal when on sale!), but it had three things I appreciated:
- It’s still really quiet compared to a regular generator and a lot of other inverter generators
- It has a 30-amp outlet built into it – that means I can plug it directly into my travel trailer like I would with shore power
- It has parallel capabilities to add a second one if desired… and it comes with the necessary parallel cables to do it!
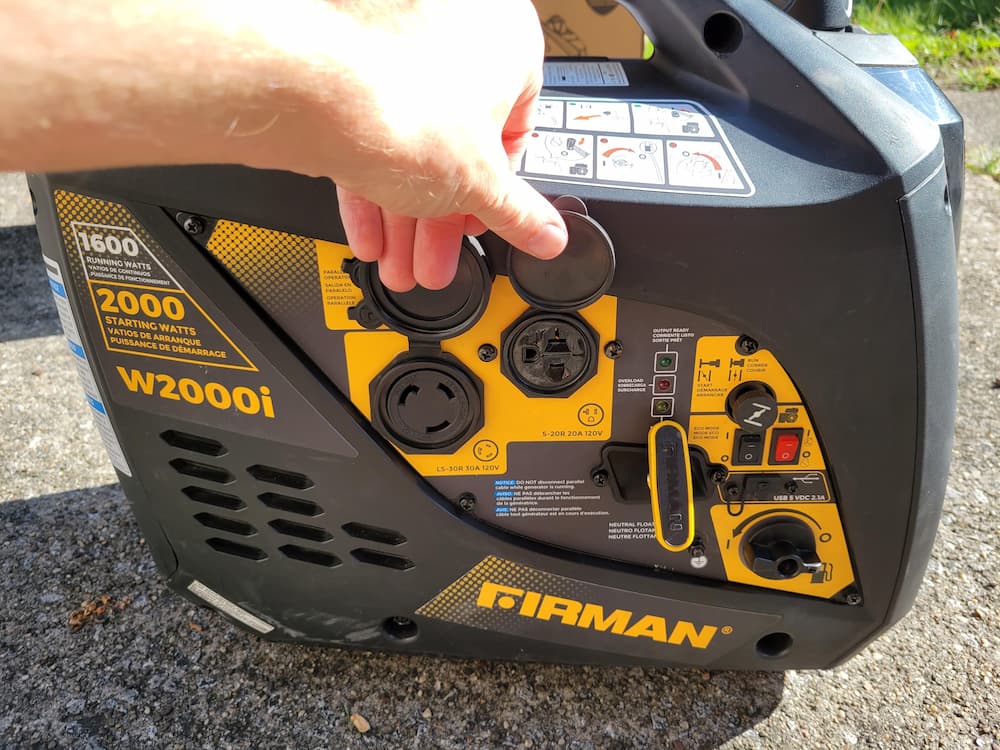
We’ve only needed this a couple of times so far and it did the job well. The plan was to add a second generator to be able to run the air conditioning if needed but we just tested it recently and it was able to run the A/C on its own, which I thought was truly impressive!
As a side note, you might also consider getting a refurbished unit through Firman’s own eBay store for a fraction of the price.
Costco Link: Firman 1600W Running / 2000W Peak Gasoline Powered Inverter Generator – W01682
eBay Link: Firman 1600W Running / 2000W Peak Gasoline Powered Inverter Generator – W01682F – Refurbished
Amazon Link: Honda EU2200i 2200-Watt Portable Inverter Generator (the “king” of the portable inverter generators)
Don’t forget a gas can or two as well!
Amazon Link: 5-Gallon Gas Can
EMS… you want this rather than a surge protector!
When plugging into shore power at an RV park, you never know what to expect. We’d love it if all power was good and clean, but that’s not always the case.
A lot of folks do get a surge protector for their RV adventure, which is better than nothing. However, using that to protect your RV that you’ve spent tens or possibly hundreds of thousands of dollars isn’t a great idea.
Instead, get an EMS (Electrical Management System). Like a surge protector, it protects against power surges, but it does a whole lot more:
- Surge protection: Shields your RV from sudden spikes in voltage that can damage electronics
- Voltage monitoring: Constantly monitors the incoming voltage and alerts you if it falls outside a safe range (typically below 105V or above 132V)
- Reverse polarity detection: Checks for incorrect wiring at the campground power hookup, which can fry your RV’s electrical system
- Ground fault protection: Detects faulty wiring that could cause electrical shocks
- Amperage monitoring: Some EMS units track the total amperage being used and warn you if you’re close to tripping the campground breaker
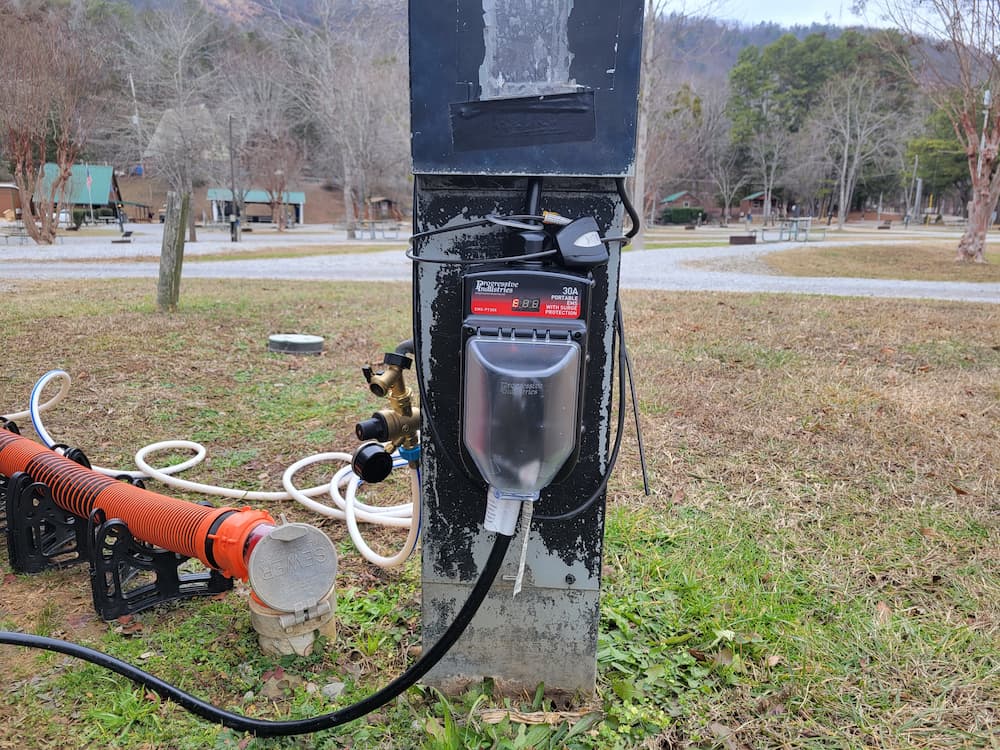
An EMS can save you from costly repairs due to electrical damage, it extends your RV appliance lifespan by providing stable voltage levels, and it minimizes the risk of electrical shocks. For a difference in cost of maybe $100, an EMS is a no-brainer over a standard RV surge protector.
We opted for an EMS for the peace of mind and the one I chose was made by Progressive Industries, a reputable name in the industry.
Amazon Link: Progressive Industries RV EMS (30-amp)
Amazon Link: Progressive Industries RV EMS (50-amp)
Lock for Surge Protector / EMS
The only downside to a good EMS is that you can’t trust everyone on your RV adventure. Most folks are good people just doing their thing and minding their business. But there will always be a bad apple or two who can’t do that and want what you have… even if it means taking it.
In other words, get a lock for your EMS (or your surge protector). I got the Master Lock Python Cable. It’s inexpensive and pulls through in an adjustable loop so you can wrap it around almost any electric post at an RV park. Hopefully, your EMS came with the metal security tab on it to lock it down (like the Progressive model we have does).
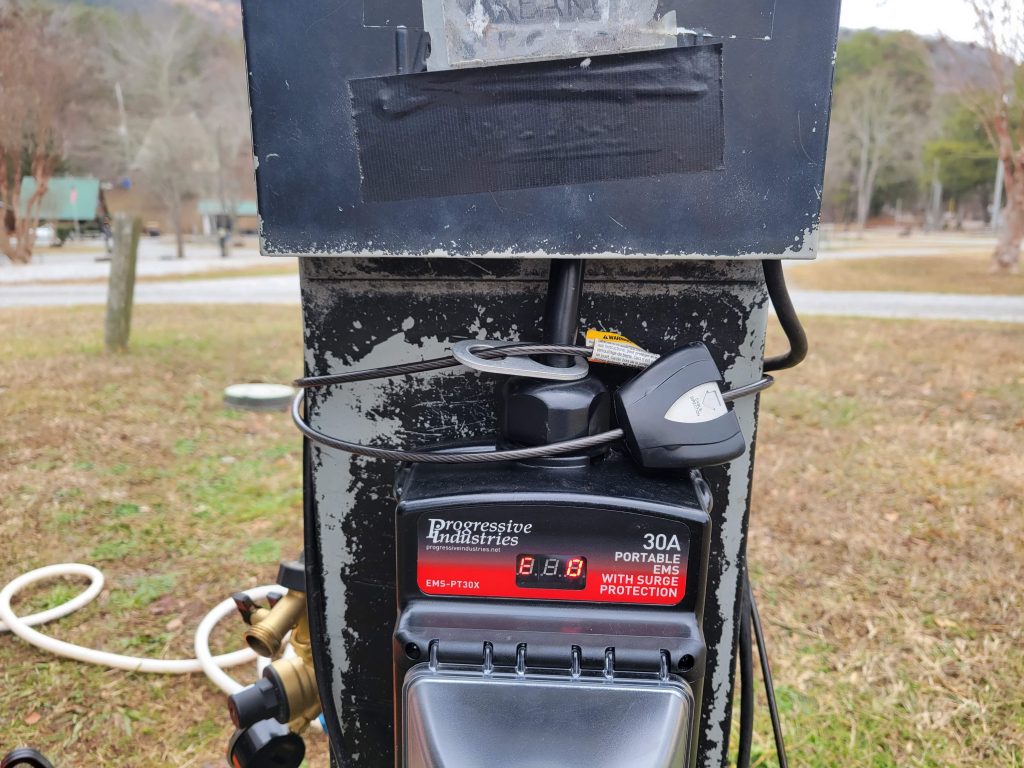
Yes, if someone wants it bad enough, they’ll get it. But your job is just to make it a little more difficult and less enticing with the hope that the bad guy will just move on to an easier target.
Amazon Link: Master Lock Python Cable
Dogbones… no, not for your pet!
Your RV is likely going to be 30-amp or 50-amp. If we pull into a park with a 30-amp outlet at an RV park with our 30-amp trailer, we’re in business. But what if they have only a 50-amp outlet (it’s happened twice for us so far) or you’re at a place with only a 15-amp outlet?
Well, you’ll be outta luck unless you have a dogbone. A dogbone is just an electric adapter that converts the current from one amperage to another. If you’re going from a circuit that’s higher than what your RV is rated for (like a 50-amp to an RV’s 30-amp), the dogbone will bring you down to the right amperage.
If you’re going from a circuit that’s lower than your RV’s though (like a 15-amp to an RV’s 30-amp), you’ll only get the amount of power the circuit allows (15-amp, in this example), but at least you’ll have some power.
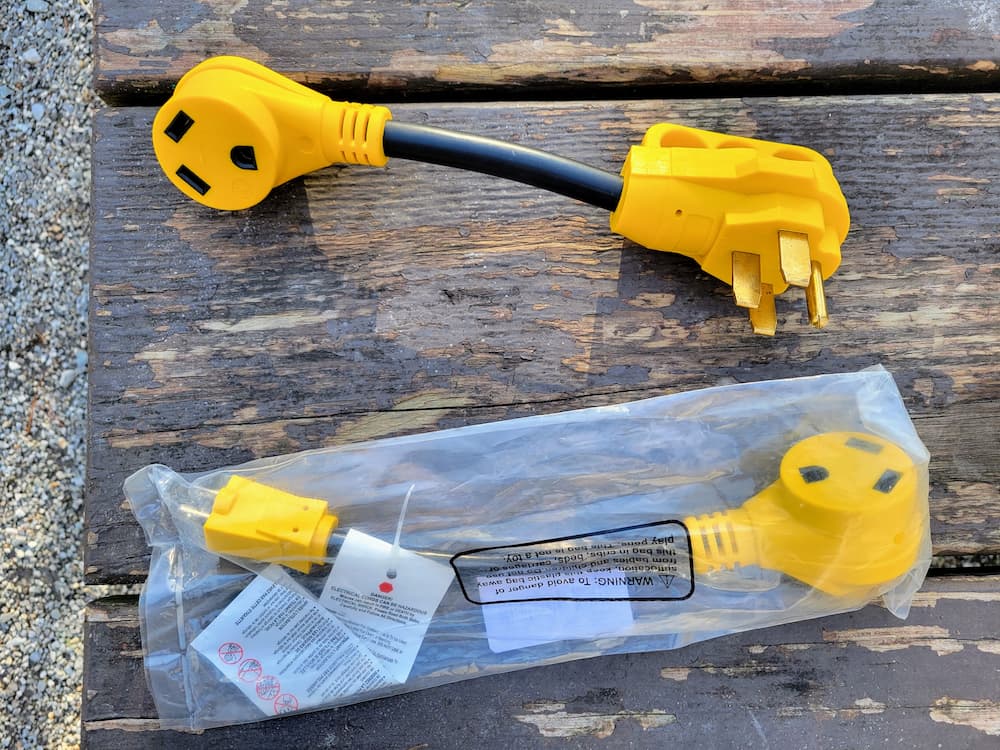
30-amp RVs:
Amazon Link: 50-Amp Male To 30-Amp Female Dogbone
Amazon Link: 15-Amp Male To 30-Amp Female Dogbone
50-amp RVs:
Amazon Link: 30-Amp Male To 50-Amp Female Dogbone
Amazon Link: 15-Amp Male To 50-Amp Female Dogbone
Spare fuses
Fuses protect the equipment in your RV. When they blow, that’s cheap insurance that would have otherwise likely meant that you would have done damage to the electrical appliance it was going to.
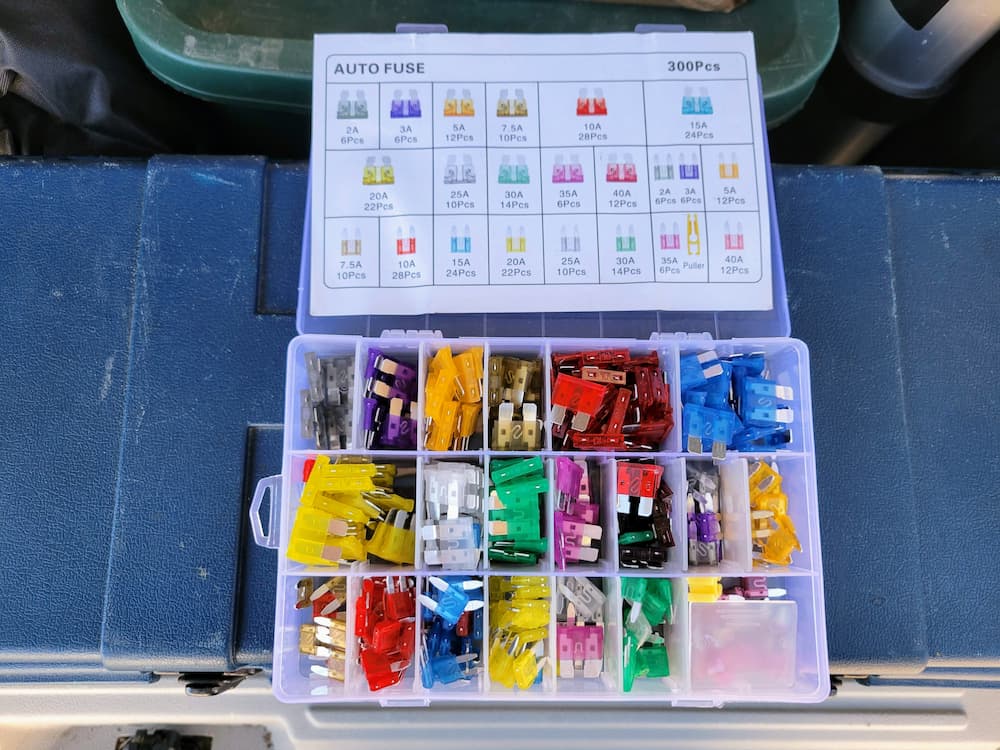
Instead, you just need to figure out why it blew so you can avoid that problem and replace the fuse. Fuses are cheap but you want them ready when you need them. Don’t wait until the problem happens at 10:00 at night in the middle of nowhere to try to figure out where to go to get a replacement. Keep some on hand.
Amazon Link: Spare Fuses Kit
Lighting
Flashlights, spotlights, nightlights… oh, my!
All our needs will be different, but for our RV adventure, there are a lot of places we’re going to visit where it will be pitch black at night. We’ll also likely not have neighbors all the time for power in numbers so we’re going to want to have some light.
We obviously have the lights in the RV and the exterior RV lights, but flashlights are important – including the powerful spotlight we bought. We’ve got lights ready to go all over the place here.

We also have a cool rechargeable light I velcroed to the wall in the bathroom that serves as a perfect nightlight. It’s motion sensing and gives off a nice ambient light instead of the bright light the overhead RV light would give off in the bathroom. I take it down and charge it about once a week as routine but it’s never dead when I do so it could likely go much longer between charges.


Amazon Link: Flashlights
Amazon Link: Rechargeable Spotlight
Amazon Link: Motion-Sensor Nightlight
Keeping Warm or Cool
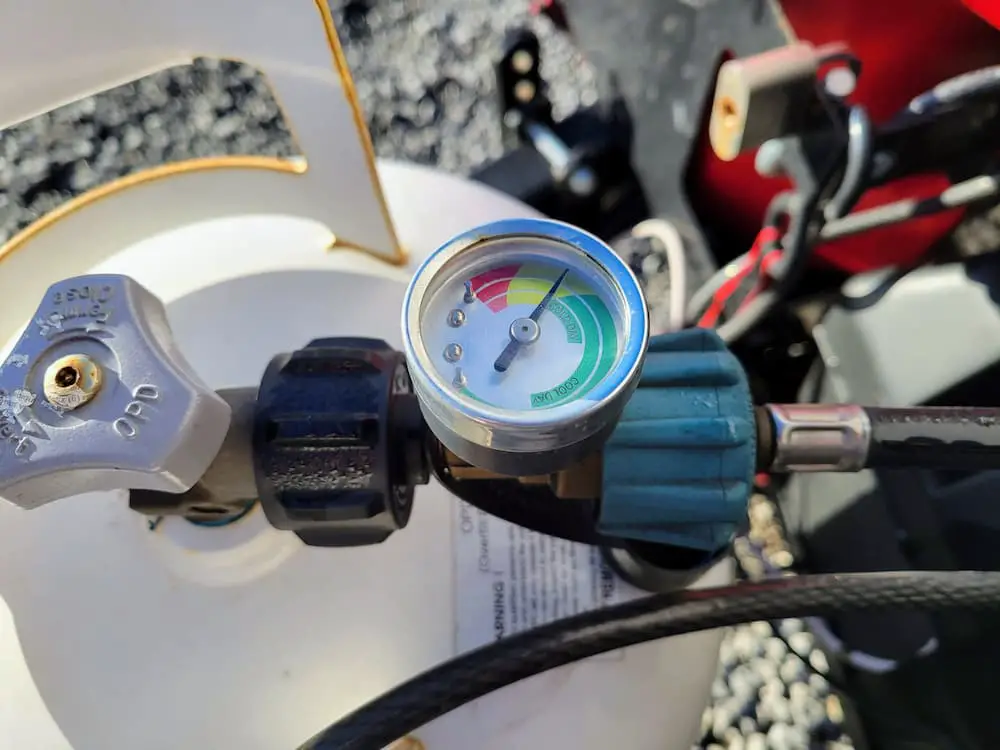
Propane gauge
When it’s cold outside and you’ve got no other way to heat your RV, you’ll be glad you’ve got a propane furnace. We’ve only needed to use our furnace once so far and we’re glad we had it!
But if you run out of propane from heating the RV, cooking on the stove, or heating your hot water tank, you might be in a world of hurt. If you can do it, opt for a larger propane tank or have a spare tank on hand.
We don’t have a large trailer though so neither of those options would work well for us. Instead, we at least have a simple propane gauge so we can keep an eye on how much is left and avoid surprises. This can be good regardless so you’re not exchanging tanks that still have some propane left in them.
Amazon Link: Propane Gauge
Portable Heater
As I mentioned, we’ve only needed to use our furnace once so far on this RV adventure. That’s because we’re trying to avoid the cold on this trip where we can. We monitor where we’re going and what the weather will be like to know what we’re getting into.
But when it’s cold and we happen to be at an RV park, our portable electric heater has been a lifesaver. We’ve only been to one park where electricity wasn’t included in the cost and none of the parks have had rules against these so this has been a winner for sure. Since we have a smaller trailer, it’s pretty easy to keep it warm.
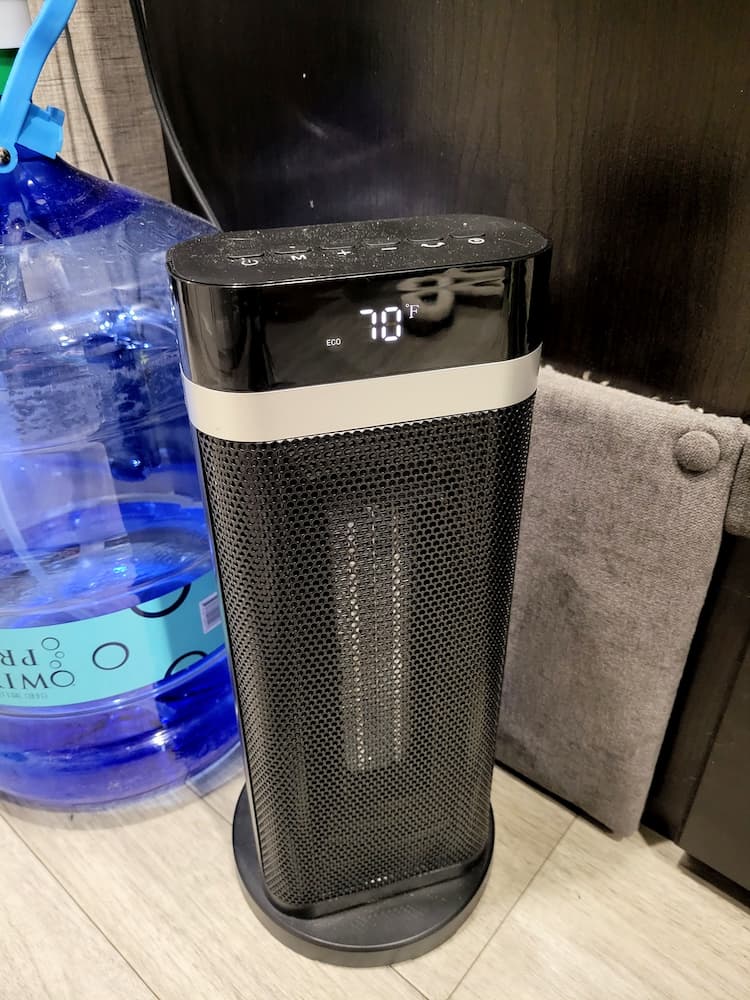
Some folks opt for heaters like the Mr. Heater Portable Buddy Propane Heaters, but why pay for propane when the electricity is included at the RV parks? Elsewhere, we can always dress warmer or use more blankets if it’s a little chilly.
I like this one because we can set a temperature on it and it doesn’t kick on or off when it hits the target temperature. Instead, it always keeps the fan running. A fan kicking on and off would annoy me while trying to sleep so I appreciate this one a lot. Plus, it’s got the tip-over feature for safety, an option for oscillation, a timer if you need it, and all sorts of goodies.
Amazon Link: Portable Electric Heater (like the one we’re using)
Amazon Link: Mr. Heater Portable Buddy Propane Heater
Portable Fans
We’ve been relatively lucky that it hasn’t been too hot where we’ve been so far. We’re four months into our RV adventure and we’ve only needed to use the air conditioning once.
That will likely change as we spend a couple of months in Florida or when spring rolls around and we start heading out west.
When we’re at an RV park and they’re springing for the electricity, that’s one thing. But when we’re boondocking and relying on our own power, we need to be a little more judicious. We’ll use portable fans throughout the day and night to try to keep cool. On a really hot day, we might also run the generator for an hour with the air conditioning on to cool down the trailer before bed though.
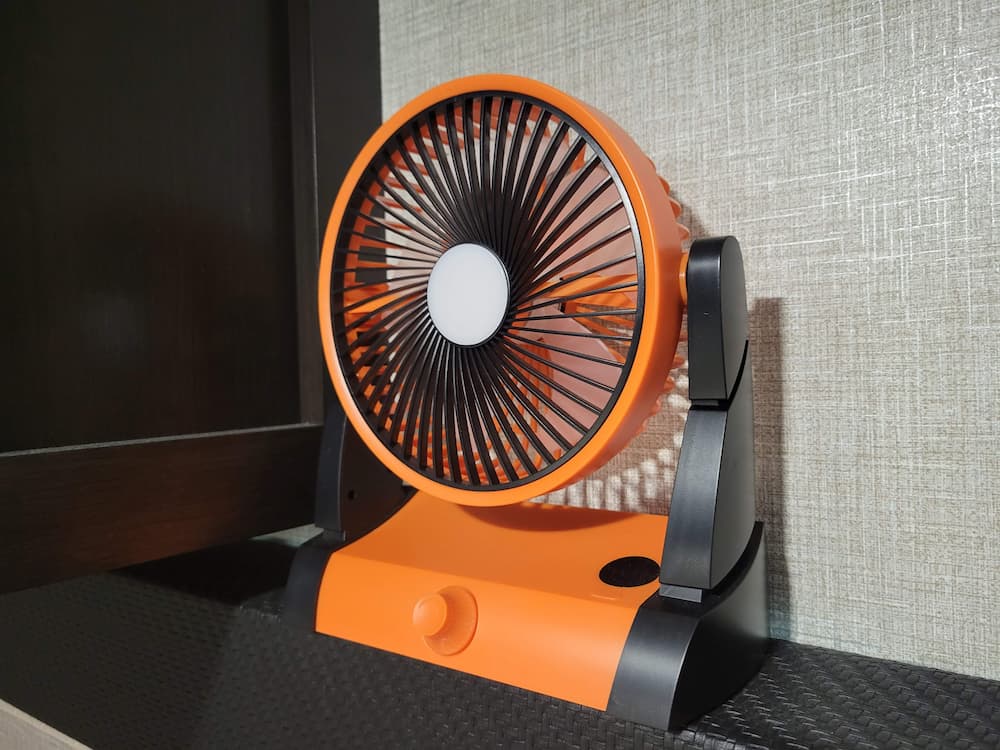
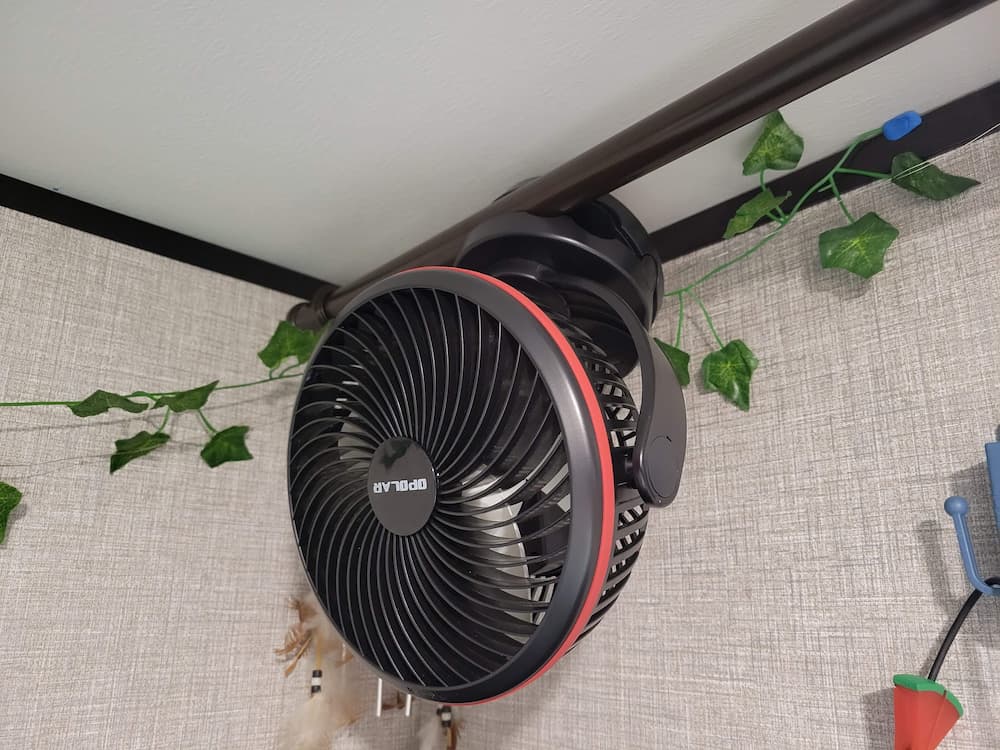
These fans run on a battery for 8-12 hours each (depending on the speed it’s on) and charge via a USB cable.
Amazon Link: Camping Fan 1
Amazon Link: Camping Fan 2
Drinking Water
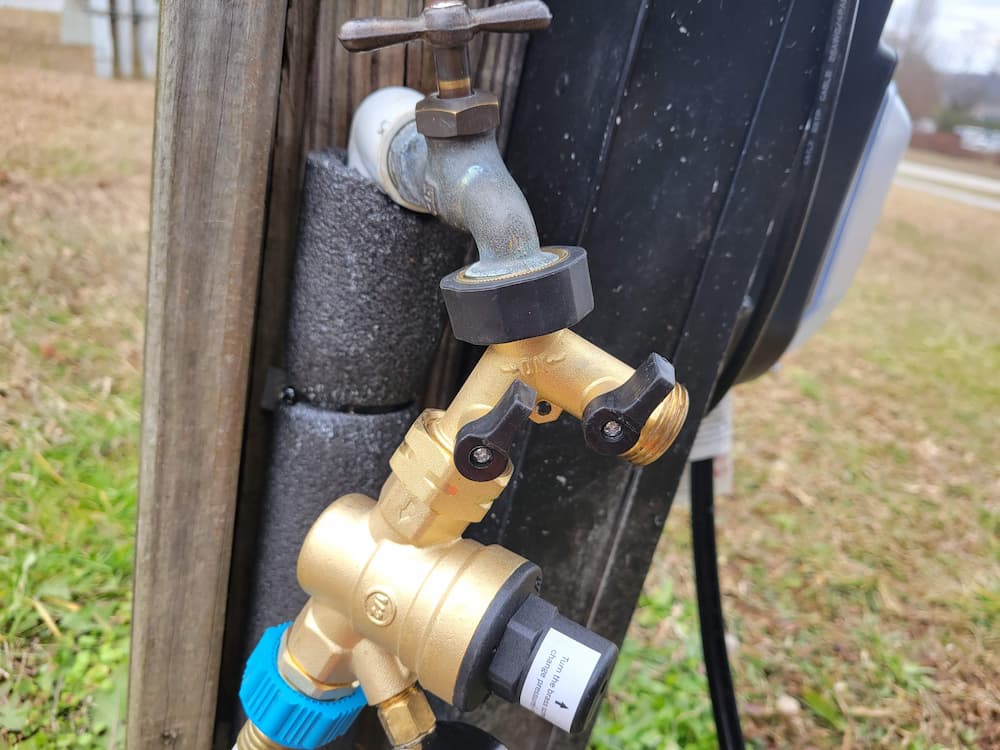
Y Valve and Small Hose
You get to an RV park and connect up your water from the post to your RV. Life is all good… until you get back from a muddy hike and want to rinse some things off first. Or you need to rinse off your dog before letting him back into the trailer. Now what?
Yeah, there are ways around this and you can turn off the water at the post and disconnect it and then reconnect it when you’re done… blah, blah, blah.
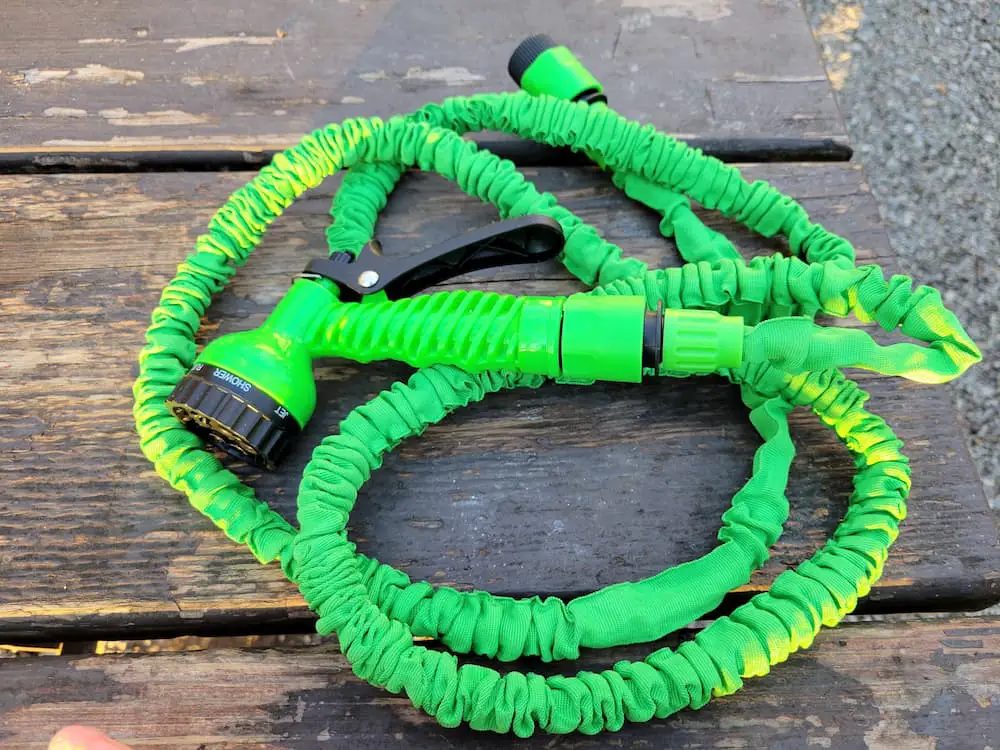
Or you just get a Y valve and make your RV adventure a little easier. Put that on the post before connecting anything else up. Then you can easily attach another small hose (we have a cheap expandable garden hose if we need it). Turn on the valve lever for that side of the Y and you’re in business. Simple and easy.
Amazon Link: Brass Y Valve
Amazon Link: Expandable Hose
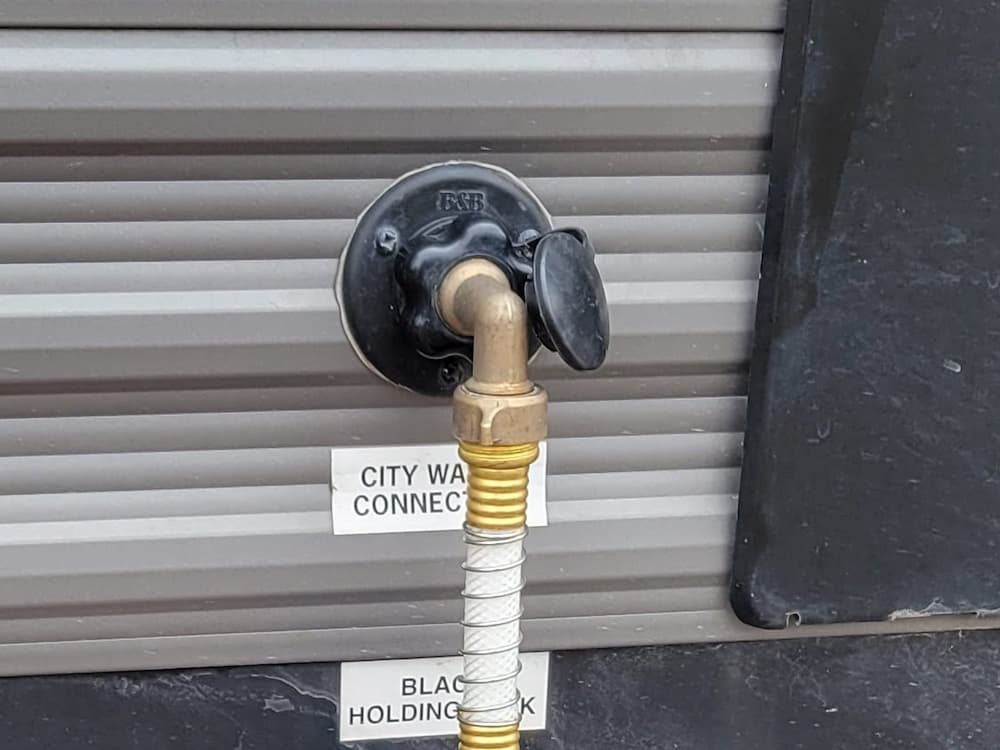
Water Pressure Regulator
Listen, you have no idea how much pressure is coming out of the post at an RV park or any water station. Too much and you could muck up the plumbing in your RV. Do yourself a favor and get a water pressure regulator.
I use one that’s adjustable but you can even just use a simple one that’s not adjustable as long as the allowed pressure is not more than what’s supported in your RV (check your RV owner’s manual).
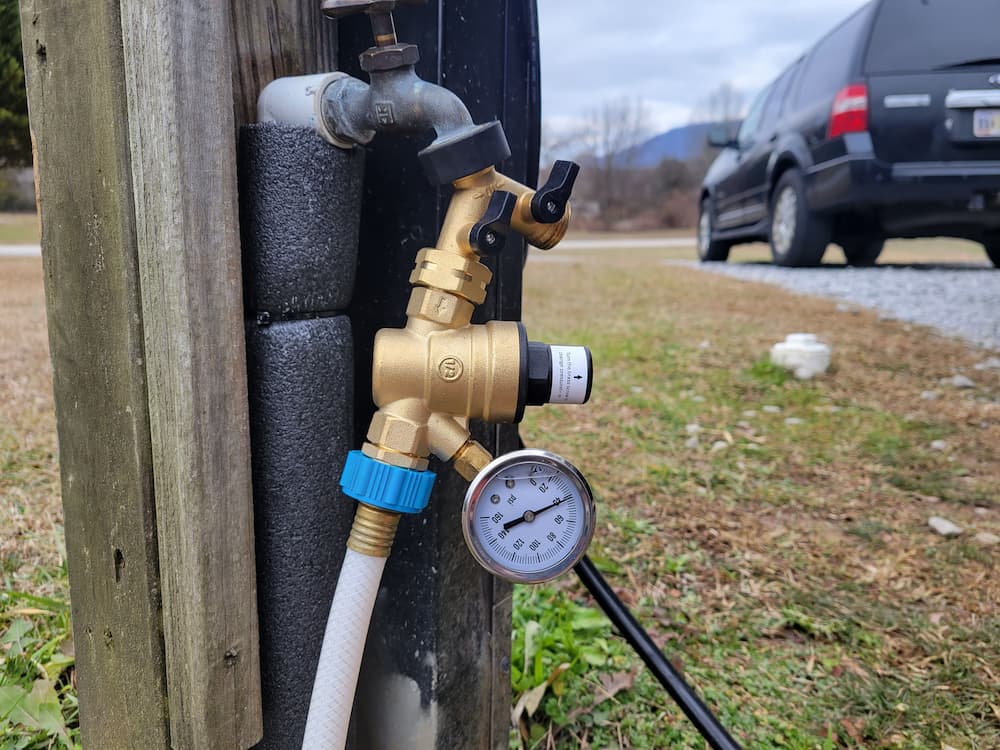
Amazon Link: Water Pressure Regulator
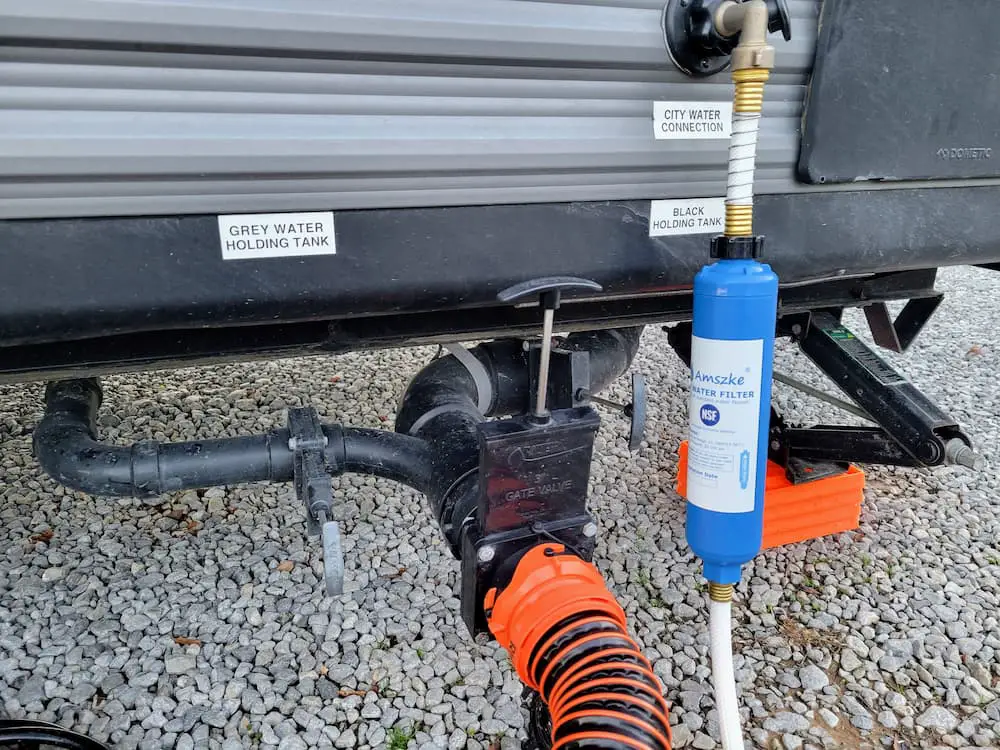
Inline Water Filters
Do yourself a favor and add an inline water filter into the path between an RV park’s water system and your RV. Even if you don’t drink the water that comes in through the RV post, any contaminants in the water pass right on through to your RV otherwise. And some of these can clog the aerators in your sink or cause other unnecessary plumbing problems.
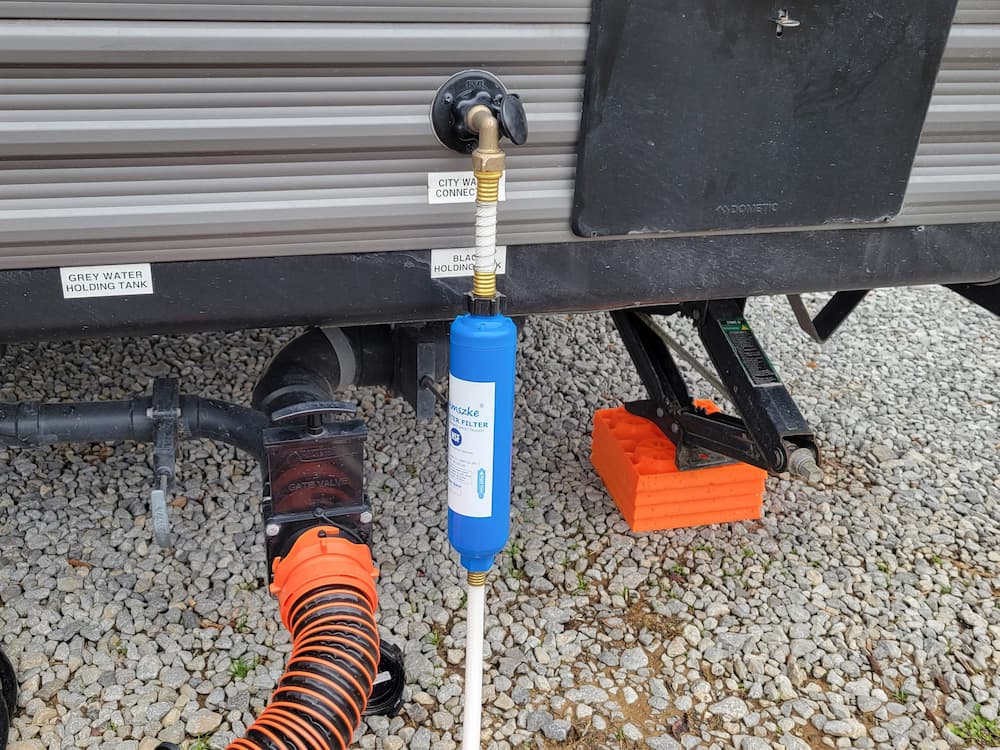
We do drink the RV park water the majority of the time. But it’s first filtered through an inline water filter before even coming into the RV and then we fill up a countertop water pitcher filter that we then get our water to drink from. It’s not going to be perfect, but it’s been working well thus far.
Inline water filters are not expensive and don’t need to be changed out too often (depending on use).
Amazon Link: RV Inline Water Filters
Brass Hose Elbow
Whether you’re using an inline water filter or not, take the pressure off both your RV’s water intake and your equipment hanging off by using a brass elbow.
Amazon Link: Brass Hose Elbow
Water Jugs, USB Pump, and Carrying Handle
We don’t drink the water out of our fresh water tank when we’re boondocking off-grid. It’s not because we can’t – it’s because we only have a 20-gallon tank, which wouldn’t leave much room for showers or washing dishes.
Instead, we have a 5-gallon jug that we got from Walmart. These are the jugs that can go on the water cooler stands.
However, we just leave it with the opening at the top and attach a portable battery-operated dispenser to it. You press a button and it pulls the water up through the hose, out the end, and right into your cup. It’s rechargeable through USB and the charge lasts a long time.
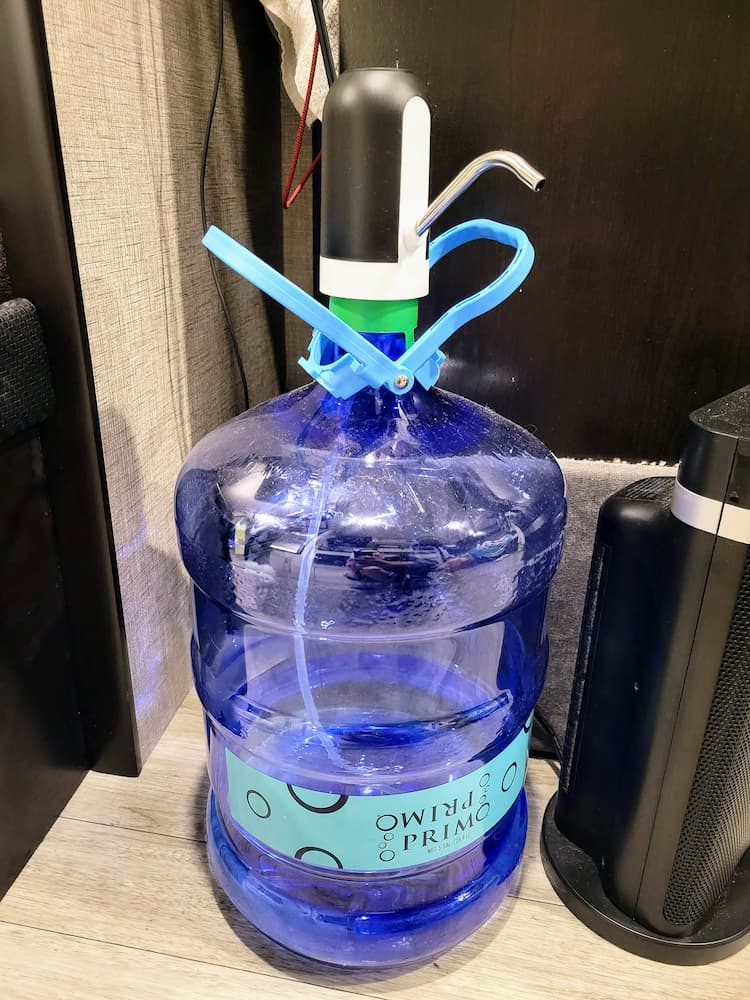
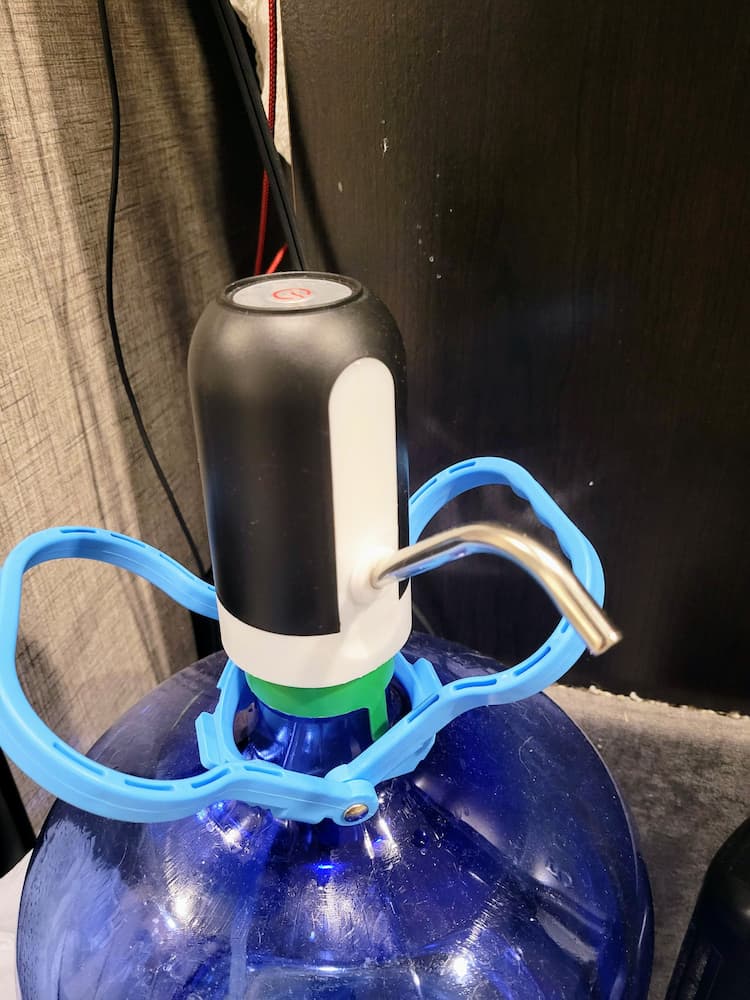
The blue thing around the neck is a handle. When the dispenser isn’t on there, the sides can flip up and clamp the neck of the bottle to make it easy to carry.
When we’re done with the jug, we bring it back to most Walmart stores (or Home Depot or a bunch of other places) and they take that to be recycled and give us a discount for a new jug.
Primo Water Service: Find Locations Near You
Amazon Link: Rechargeable Water Dispenser
Amazon Link: 5-Gallon Water Jug Handle
Bathroom and Sewer
Water-Saving Showerhead with On/Off Trickle Switch
Our RV came with a perfectly fine showerhead. But when you’re planning on boondocking and you’ve got a small freshwater tank (ours is only 20 gallons), you want to take it a step further with an easy fix.
The two keys to a good showerhead for boondocking are:
- You want it to use less water but still have good pressure. Many showerheads can accomplish this by forcing air out with the water so it “feels” like you’ve got great pressure without using as much water.
- You want it to have a pause button that still allows water to trickle out. Obviously, being able to pause the water while you scrub up will save a lot of water. But the trickle feature is great because it maintains your water temperature. Then when you resume, you don’t get a few seconds of cold water like you would otherwise.
This does both jobs and does them well.
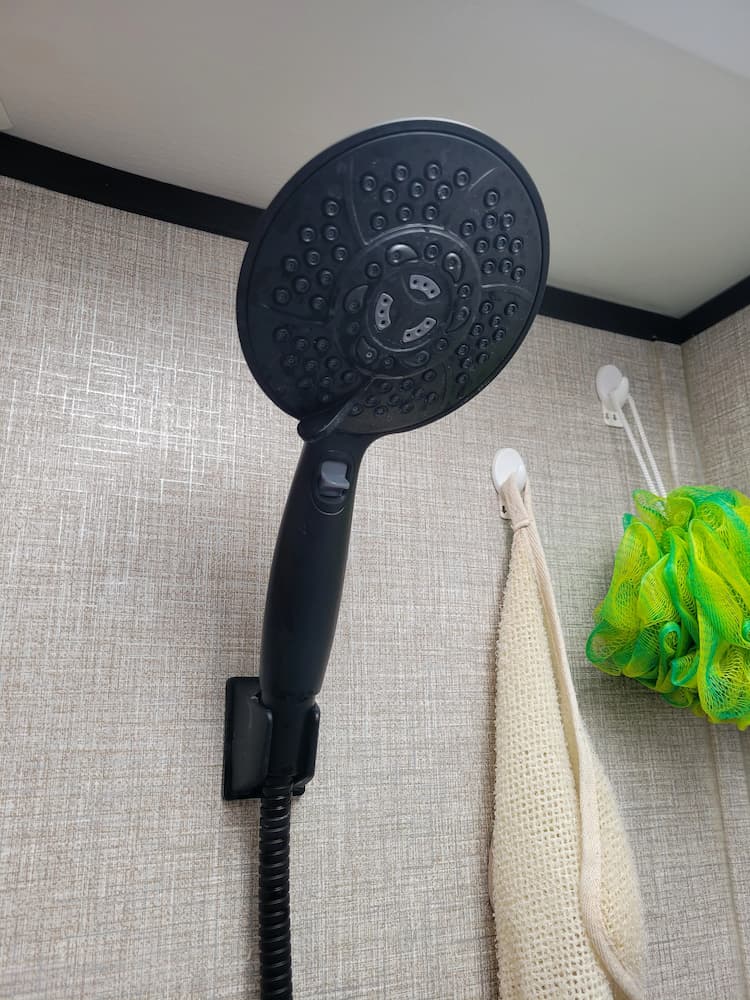
Amazon Link: Water-Saving Showerhead (with Hose) and Trickle Pause Switch
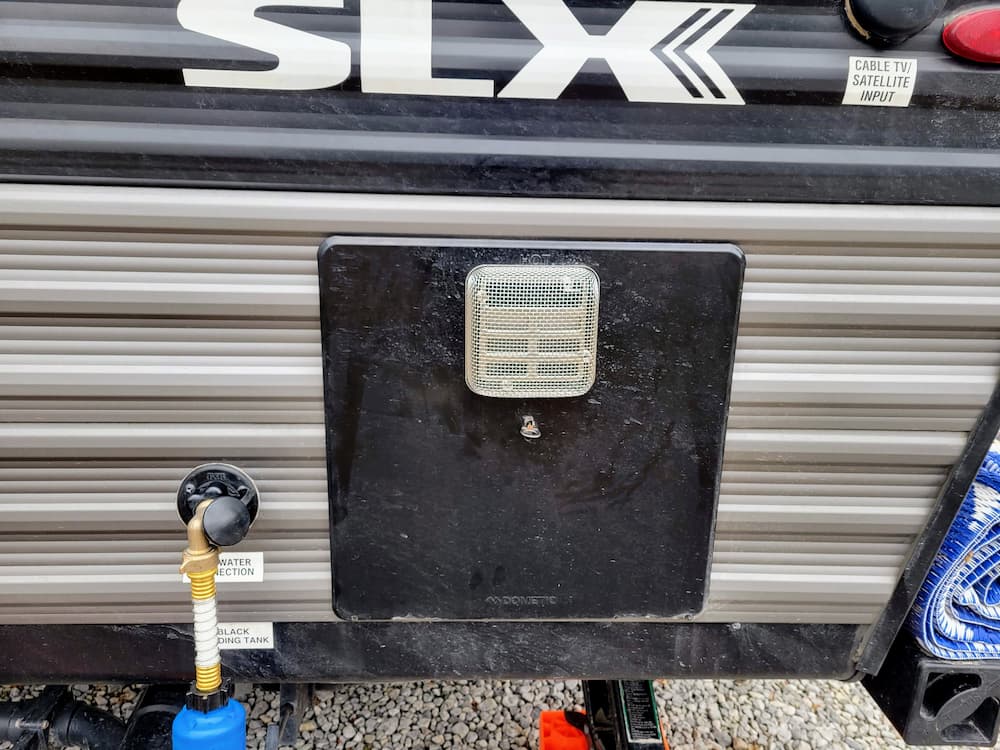
Hot Water Tank Plug Wrench or Socket
One of the jobs that comes with almost every RV adventure is draining the hot water tank. That could be for winterizing, sanitizing, or troubleshooting, but it’s almost inevitable that you’ll need to empty it.
And the way to do that… remove the drain plug and let the water flow out. Easy enough if you have the right tool to do it. Using pliers or a pliers wrench works but could cause damage to the plug itself.
Instead, get yourself a deep socket that will fit it or a wrench specifically designed for the plug. I was using a socket on my drill but I’m switching to a wrench just because I think it’ll be a little more convenient.
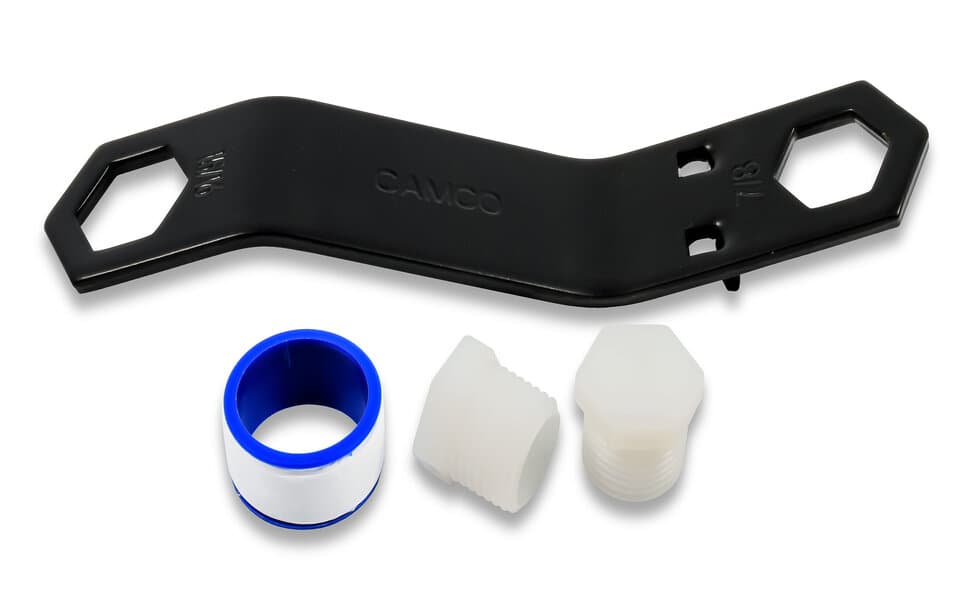
Amazon Link: Hot Water Heater Wrench (with Replacement Plugs)
RV Sewer Hose Support
You definitely want a sewer hose support in place. Not only does it take some pressure off the hose but it helps guide the wastewater downhill to flow better. This support is easy to set up, can be routed in different directions as needed, and collapses right back down.
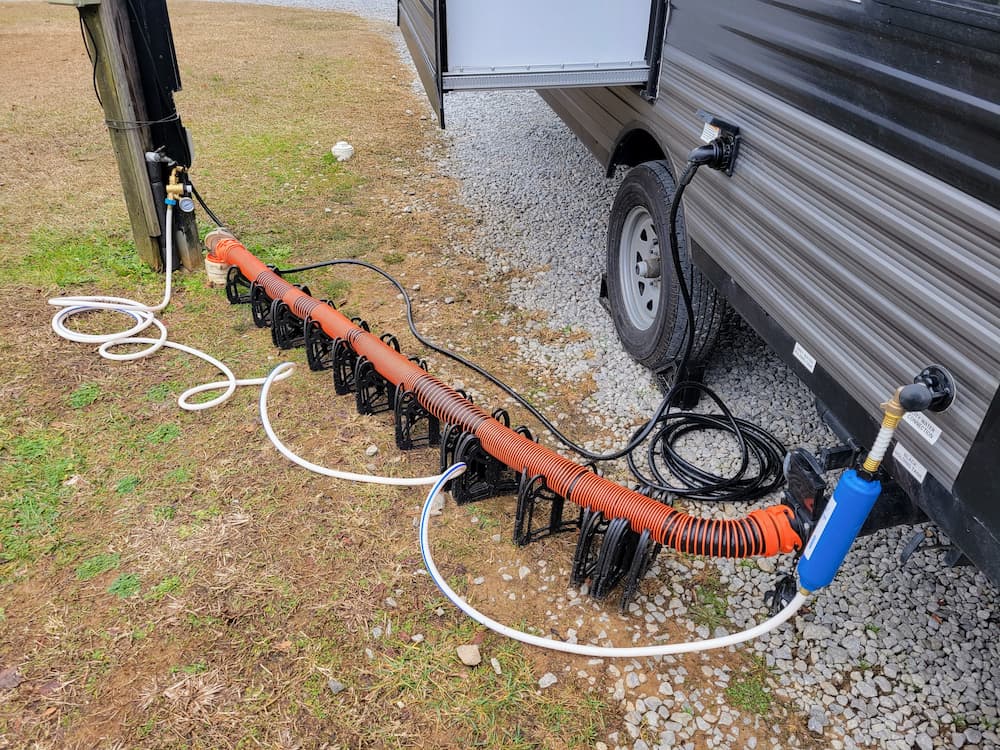
Not sure what you could ask for in an RV sewer hose support, but I’ve got no complaints on this one!
Amazon Link: RV Sewer Hose Support
Clear RV Sewer Hose Elbow
I like this sewer hose elbow from Camco. First off, it’s clear so you can see what’s doing when you’re emptying. Gross? Maybe (unless you’re using a composting toilet like we are!), but you need to know what’s coming out of those tanks.
Second, I like that it connects to different-sized dump station inlets.
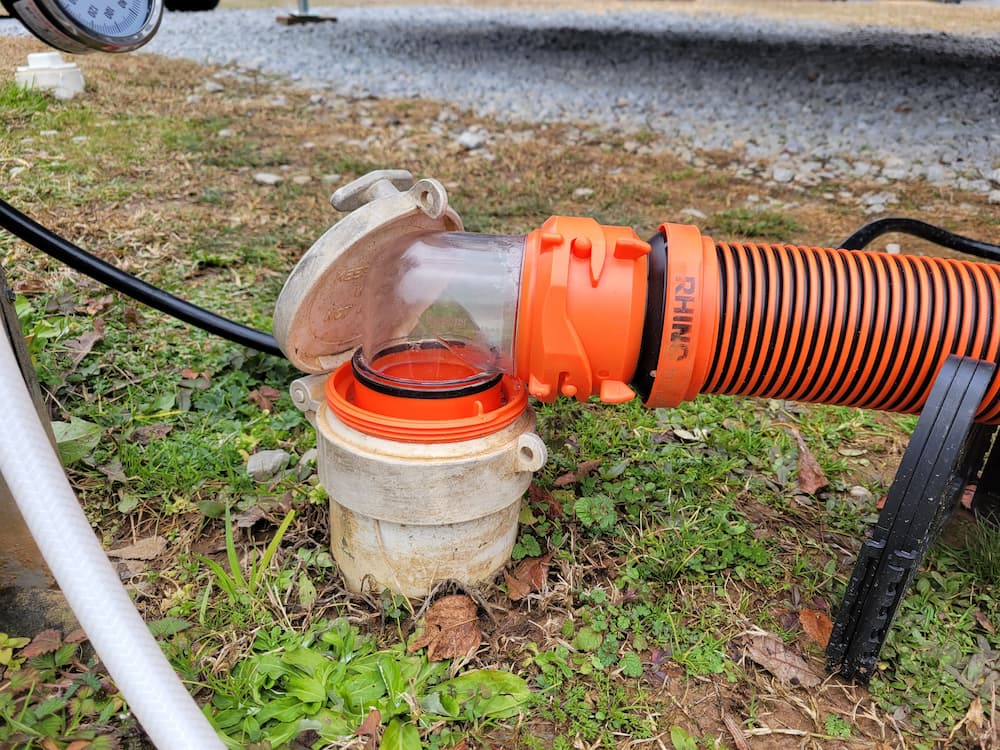
Amazon Link: Clear RV Sewer Hose Elbow
Nitrile Gloves
I think this is pretty self-explanatory. If you’re going to be working with a sewer hose or touching anything at a dump station, you want some gloves. I use nitrile gloves but you can use whatever works for you.
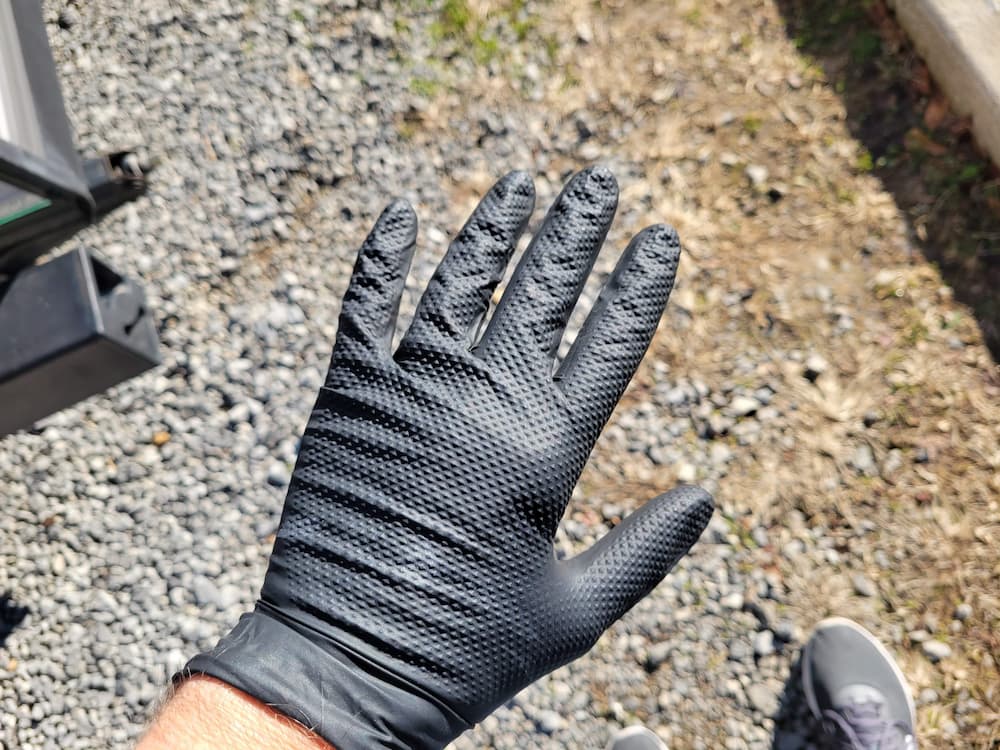
Amazon Link: Nitrile Gloves
Air Head Composting Toilet
This was a big one. It involved a lot of work but it’s made this RV adventure so much nicer.
We went in this direction so we could boondock more and not worry about the black tank filling up. I wrote more about why we made this change and why we went with Air Head here. I also documented the entire installation on YouTube which you can watch here.
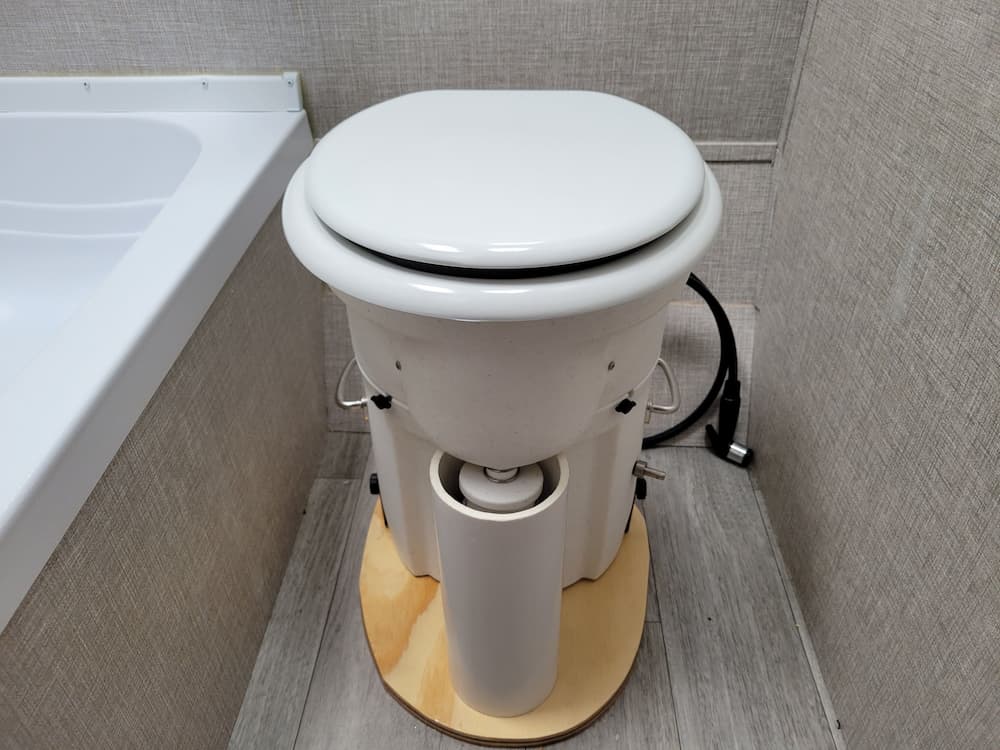
The bonus? It’s been so great not dealing with the horror stories of the black tank backing up, the infamous “poop pyramid“, the smell, or just dealing with emptying that nightmare. We don’t deal with any bad smell and emptying this toilet periodically has been a walk in the park that we’ll take any day!
For extra credit, I alleviated the need to empty the “urine jug” part of the composting toilet by removing the jug and plumbing directly into the black tank.
Link: Air Head Toilet
Amazon Link: Nature’s Head Toilet (a Popular Alternative)
Amazon Link: Coco Coir (What We Use as Compost Base)
Auto Open/Close Trash Can
A big debate in the RV community has to do with whether or not you should flush toilet paper down or throw it in the trash. It might sound gross, but using a trash can could potentially alleviate bigger, smellier problems down the line.
Since we’re using a composting toilet, we just use a trash can for our toilet paper. Some might argue that toilet paper will compost as well but it does slow down the process so it just doesn’t make sense to do.
There are so many choices for a trash can (some folks even use a diaper pail), but we decided on one that opens and closes automatically as your hand goes over the sensor. That keeps the smell to a minimum (it’s really not bad and we change the bag out every couple of days) and it means we don’t have to touch anything to open or close it.
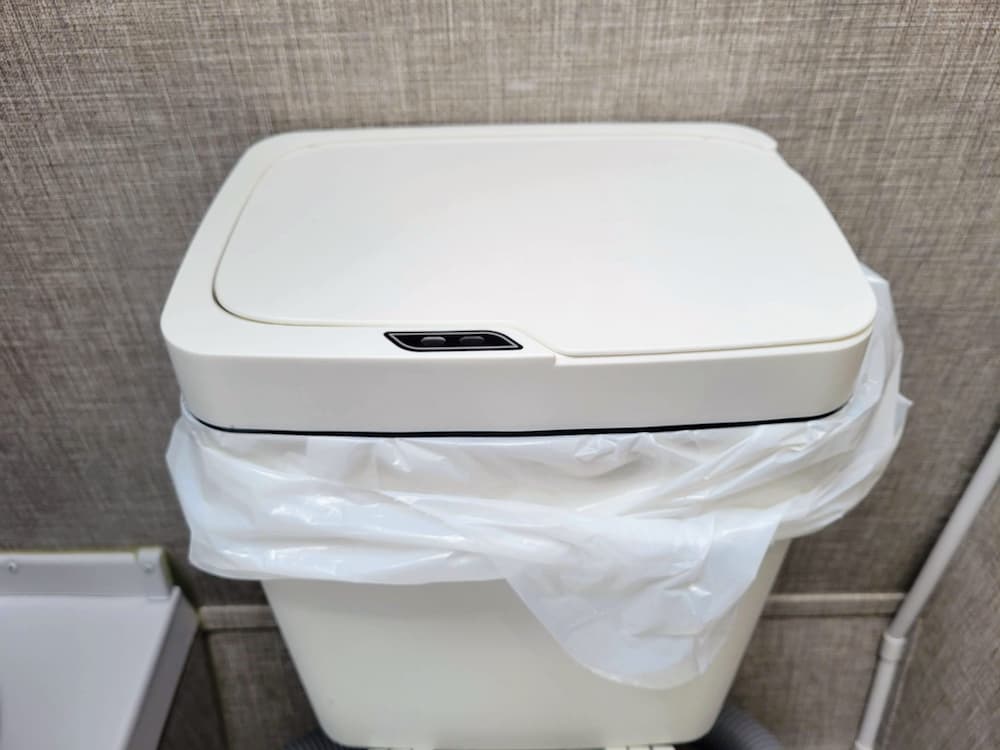
Amazon Link: Auto Open/Close Trash Can (Touchless)
Valtera T58 Valve
Because we’re using a composting toilet and no longer need a black tank (which has never held any poop), we use a Valterra T58 valve to combine our black and gray tanks into one big tank.
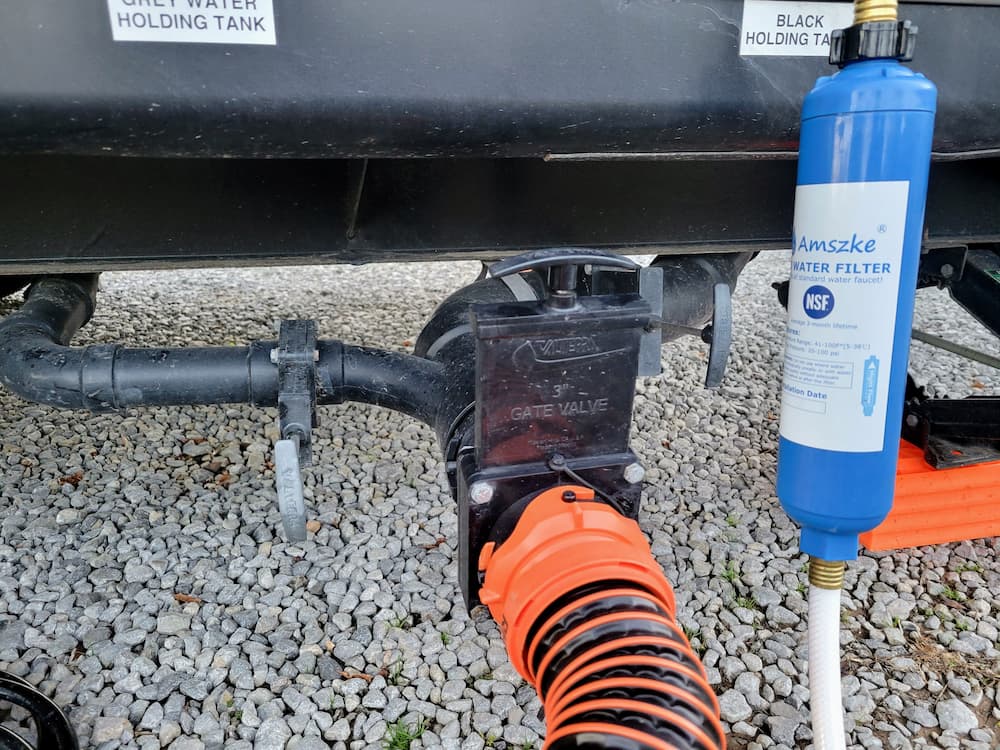
The Valterra valve simply hooks onto the end and then we keep the individual valves for our black and gray tanks open. When we’re ready to empty, we hook up our sewer hose and just pull the handle open on the Valterra valve. Works like a champ and doubles our gray tank capacity!
This is completely and easily reversible, too, which is a real bonus.
Amazon Link: Valterra T58 Valve
Organization
This category is enormous and can make your RV adventure a frustrating mess or a less chaotic and more organized place to be. Here are just a few of the things we have in place in our trailer that we’ve found helpful:
Shoe Holders
We love these! We mounted them alongside the bedside for all our shoes. I initially used the adhesive that it came with but it didn’t hold well. This was one of the few things I actually cut holes into the trailer for so I could bolt these in. The reason I’ve been careful is that we’re going to sell the trailer after this awesome RV adventure is done. But I’m confident that this is something anyone buying would appreciate.
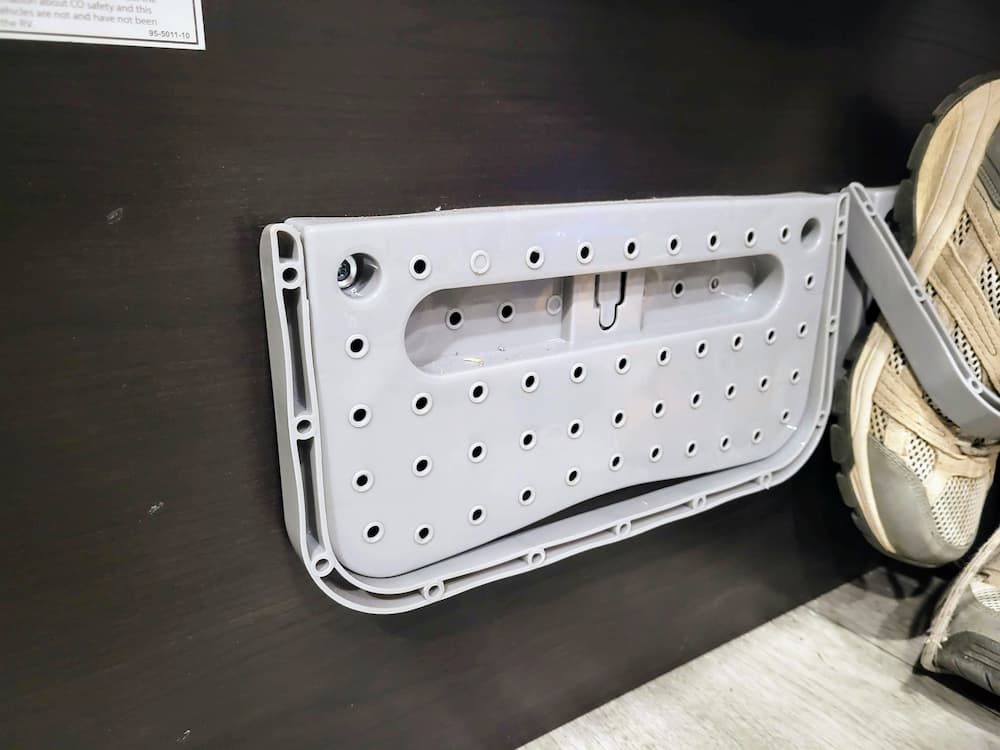
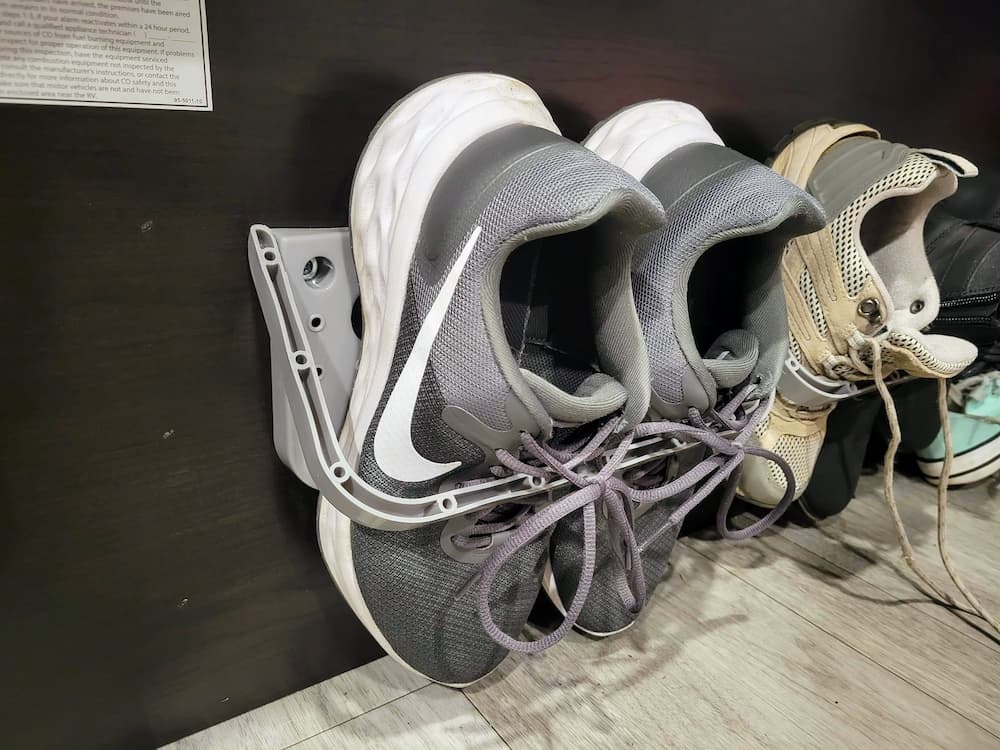
We now have five of these installed and they work great!
Amazon Link: Wall-Mounted Shoe Holders
Over-the-Door Shoe Organizer… but Not for Shoes
We’ve got limited space in this 21′ RV travel trailer so finding places for everything requires some thought. This over-the-door-shoe rack gives a ton of space for all our odds and ends that we need more routinely.
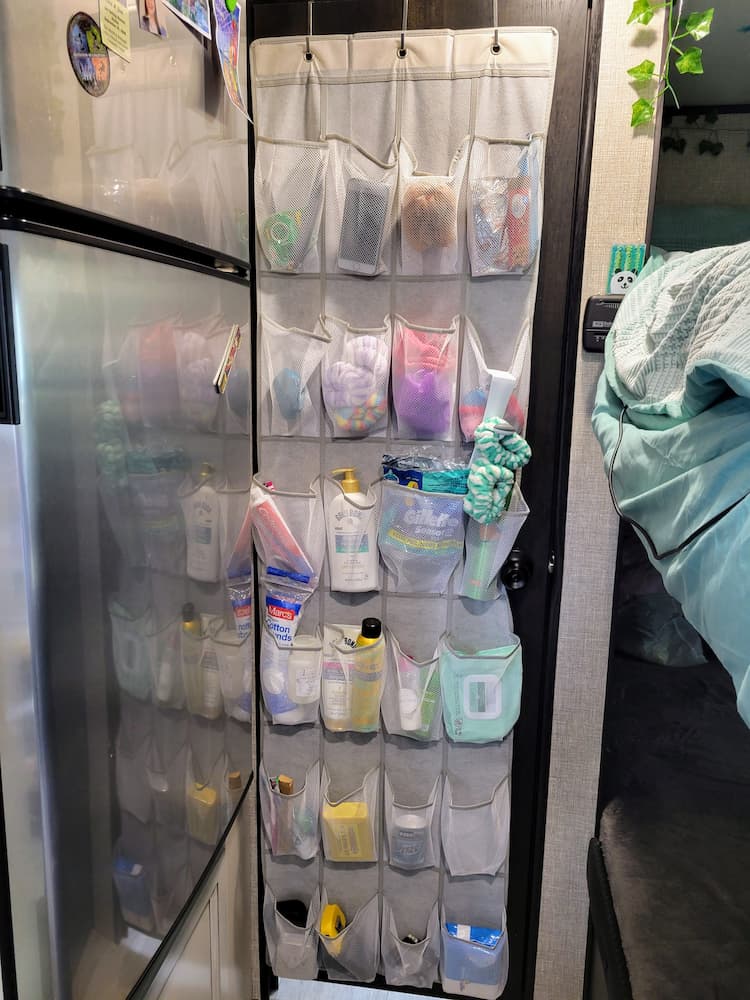
Amazon Link: Over-the-Door Shoe Organizer
Shower Caddy
Our bathroom is tiny… like really tiny. There is zero storage in the bathroom so one of the things we did to hold our shower stuff was to put in a curtain rod across the back wall. It’s out of the way but passes through into the shower. That gave us an easy way to hang some mesh storage bags as a shower caddy. As a bonus, I now have a spot to hang my towel outside of the shower.
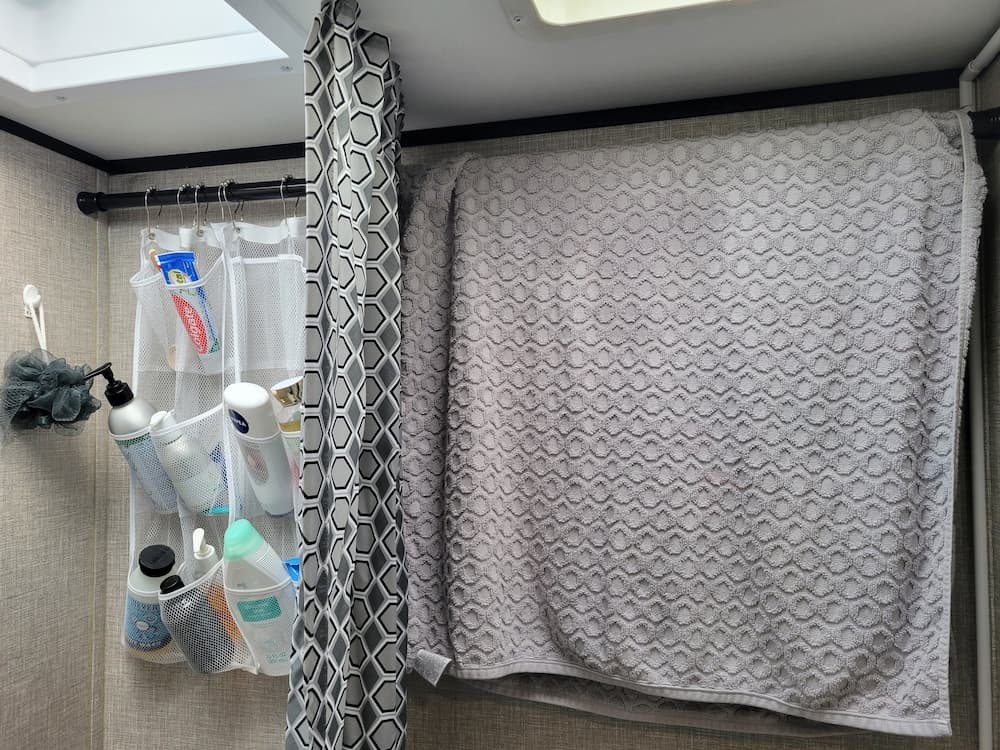
Amazon Link: Hanging Mesh Shower Storage Bags
Cell Phone Holders
We have a couple of these stuck on the walls in the trailer by the beds. They give us a way to have our phones nearby (we use them for white noise at night) and out of the way.
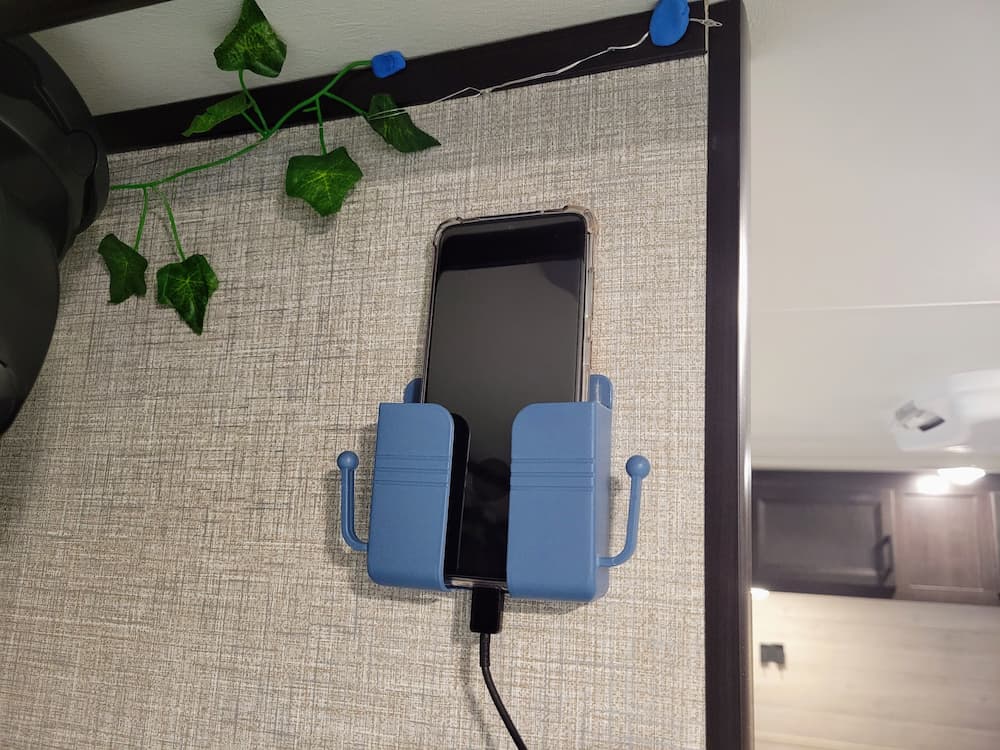
Amazon Link: Wall-Mount Cell Phone Holder
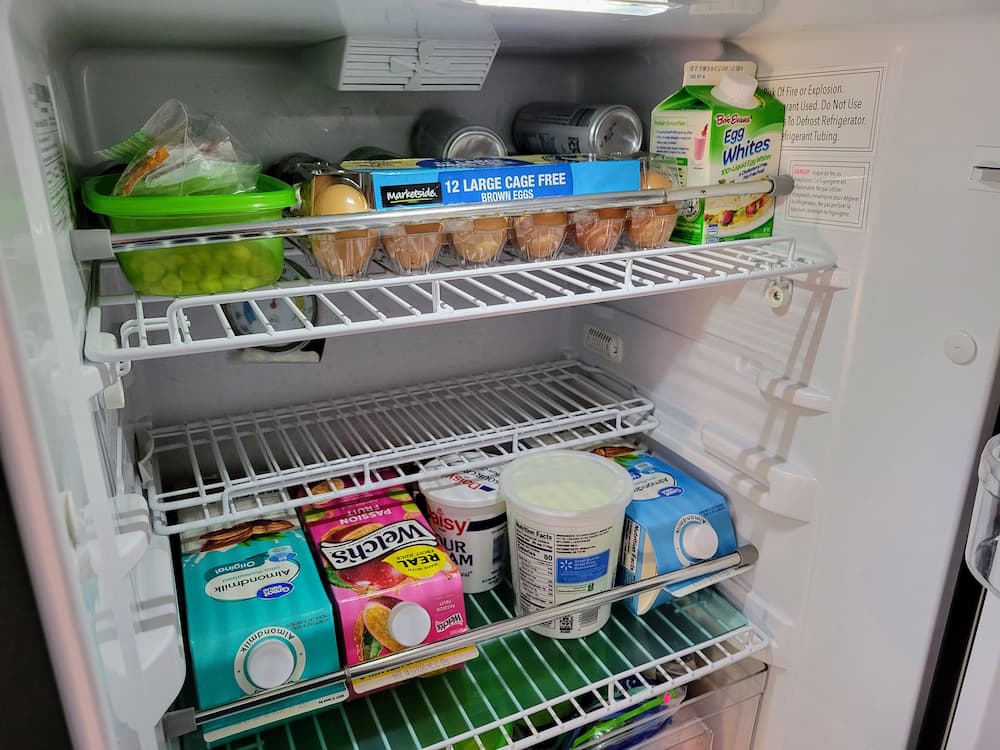
Tension Rods
Lisa puts a couple of these up in the refrigerator when we’re packing up to go to the next site to keep everything from jostling around while driving. Very helpful!
Amazon Link: Small Tension Rods
Baskets, Organizers, and Hooks
We’ve got ’em everywhere. Lisa and I each have a basket near our bedside to hold things like our Kindle Paperwhites, reading glasses (yeah, I just hit that age!), earbuds, etc. We’ve got hooks to hang towels and jackets, We’ve got hooks to hang keys.
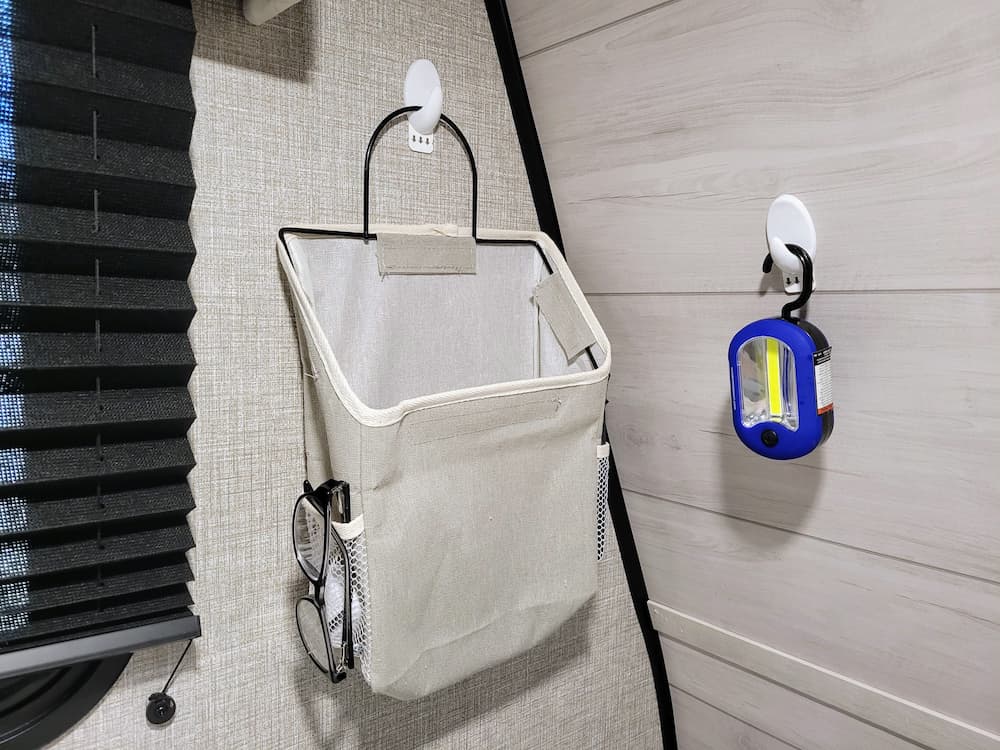
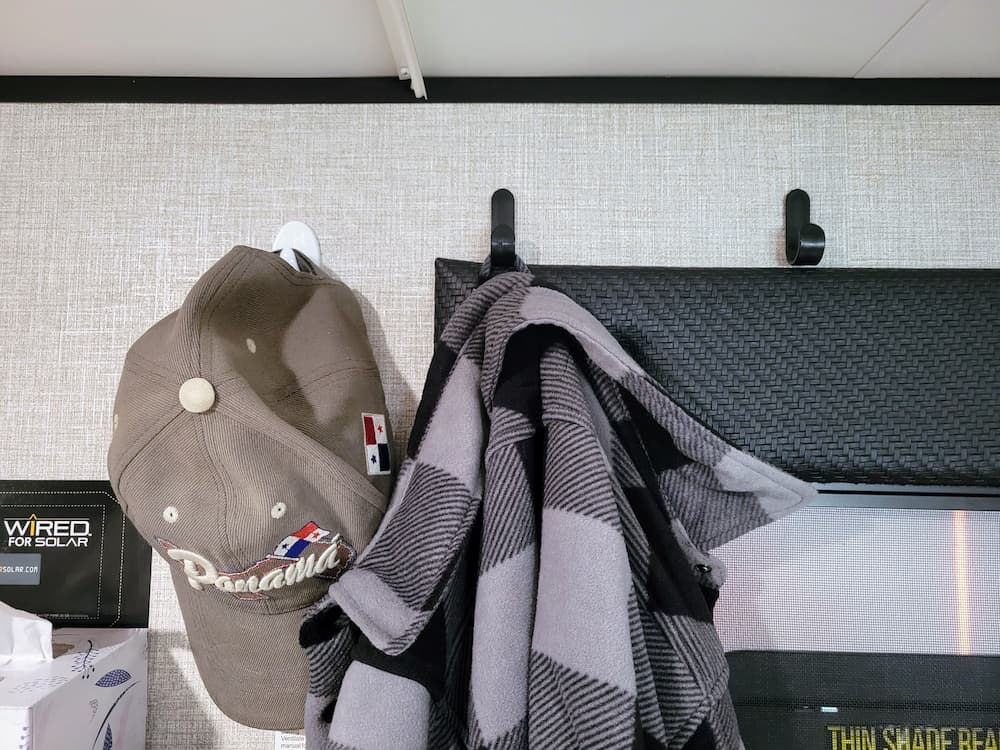
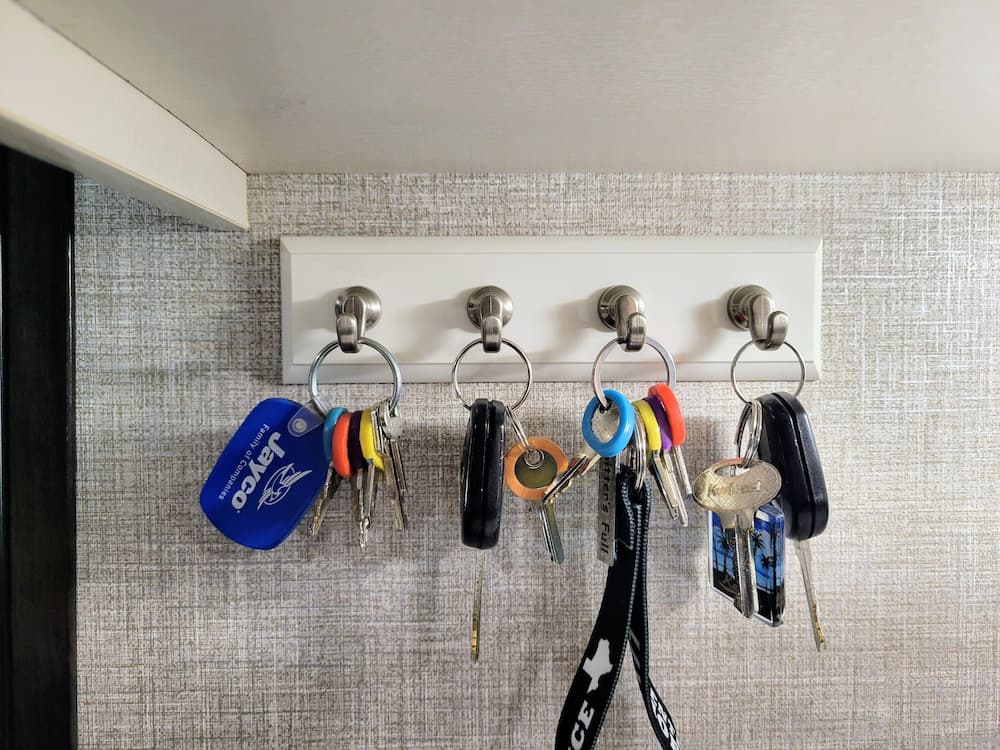

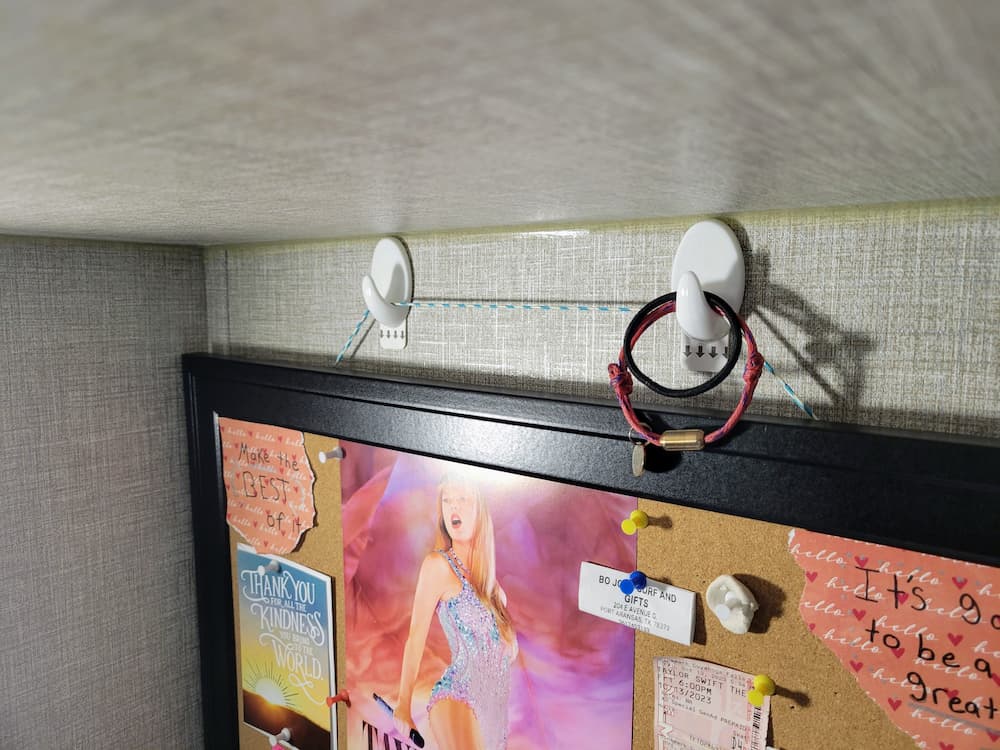
Where in the world would we be without 3M or Command Strips?!
Side note: If you have problems with the strips sticking on your RV wall, we find it works better when we clean the wall first with rubbing alcohol. Then we apply the strip with or without the hook and leave it sitting empty for 24 hours. Then we use it. If all else fails, we just got turned onto Alien Tape (double-sided) and that is some pretty awesome stuff!
Amazon Link: 3M Command Products
Amazon Link: Alientape
Enjoying the Outdoors on an RV Adventure
Camping Chairs
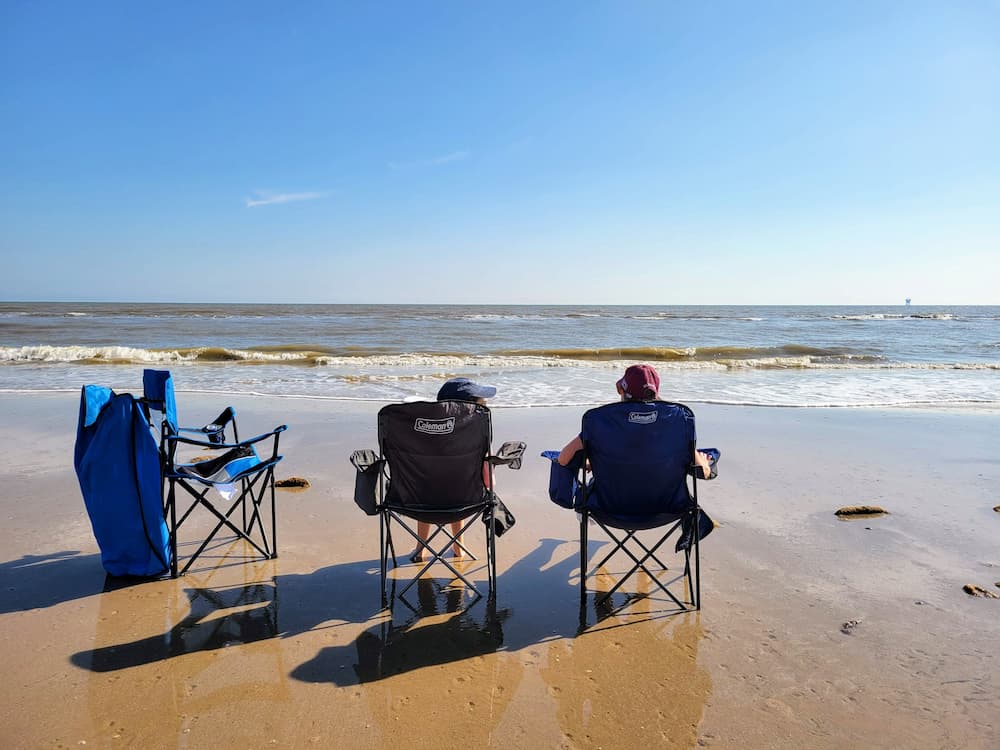
These are pretty much a gimme. Not having a place to sit off the ground while camping isn’t too much fun!
Amazon Link: Camping Chairs
Portable Camping Table
Usually, RV parks provide a picnic table where you can set up shop when you want to eat outside. But when you’re out boondocking without those small comforts, you might want to have a table to use outside.
We went back and forth on what to get for our RV adventure. A card table is probably the easiest way to go but, as I’ve mentioned, space is at a premium for us and that’s kind of a bulky space hog.
Instead, I found a nice table that rolls up and packs away in a bag a little smaller than one the camping chairs come in. Perfect for our needs!
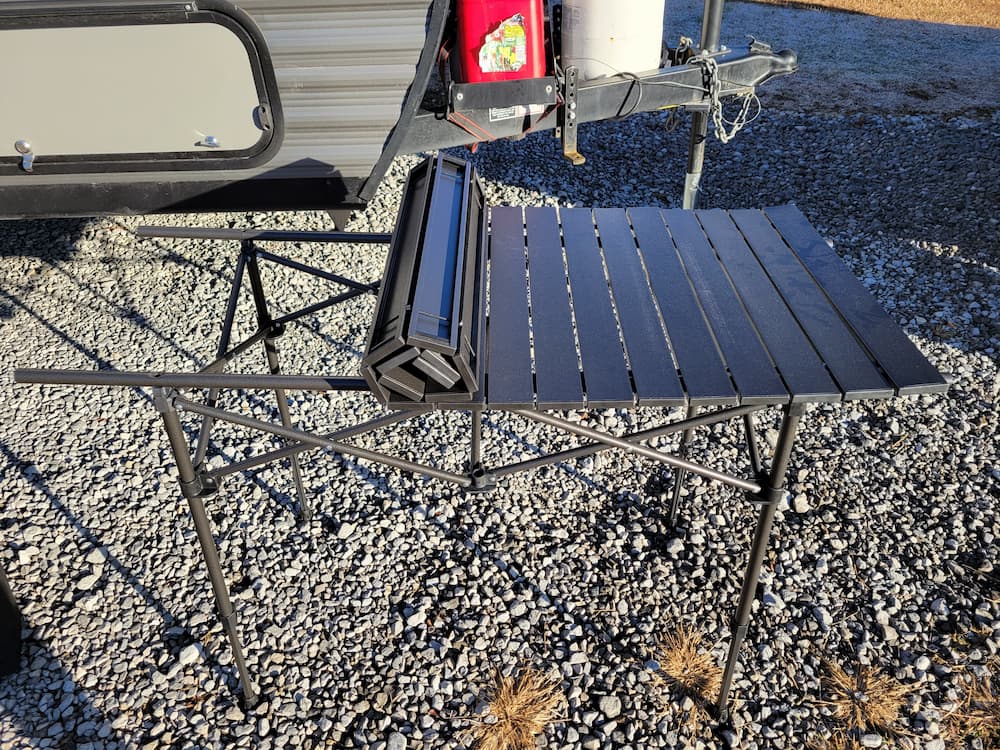
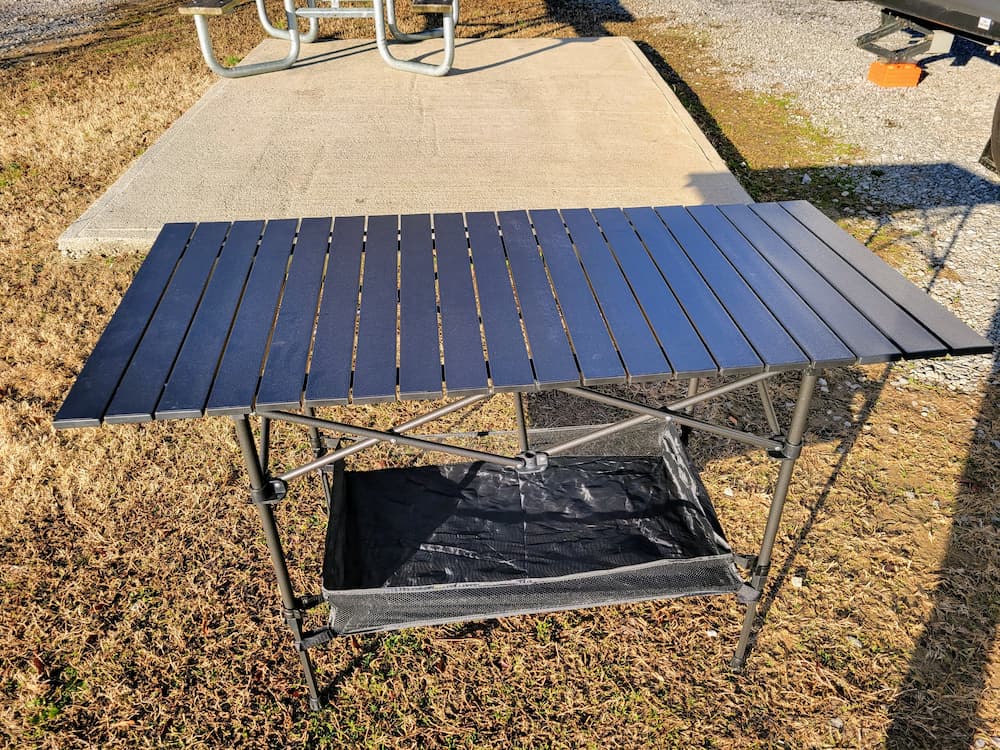
Amazon Link: Portable Camping Table
Screen House
When you dream of how cool your awesome RV adventure is going to be, maybe you envision something like sitting outside and watching the sun proceed to set over a nearby lake. Maybe it’s hanging out in a circle of friends just laughing and enjoying the evening.
Sounds great… in your head. But in reality, there are usually a couple of problems with those dreams:
- Bugs
- The Sun
The reality is that you’d either be smacking at bugs constantly in the evening or getting scorched by the Sun during the day. Both of those aren’t so fun.
I wanted a screen house to avoid those issues while still allowing us to enjoy the outdoors on our RV adventure. These come in all shapes and sizes. But I wanted something light and easy to put up and take down. After all, I know me, and if it’s not easy, I’ll just want to skip using it often and that’ll ruin the whole point. Plus, we need to be careful about adding too much weight and storage to what we’re carrying.
Then I stumbled on the Alvantor screen house… exactly what I was after. It’s extremely light, takes just a minute or so to set up or take down, and it’s big. Ours is 10′ x 10′ but they do have different sizes.
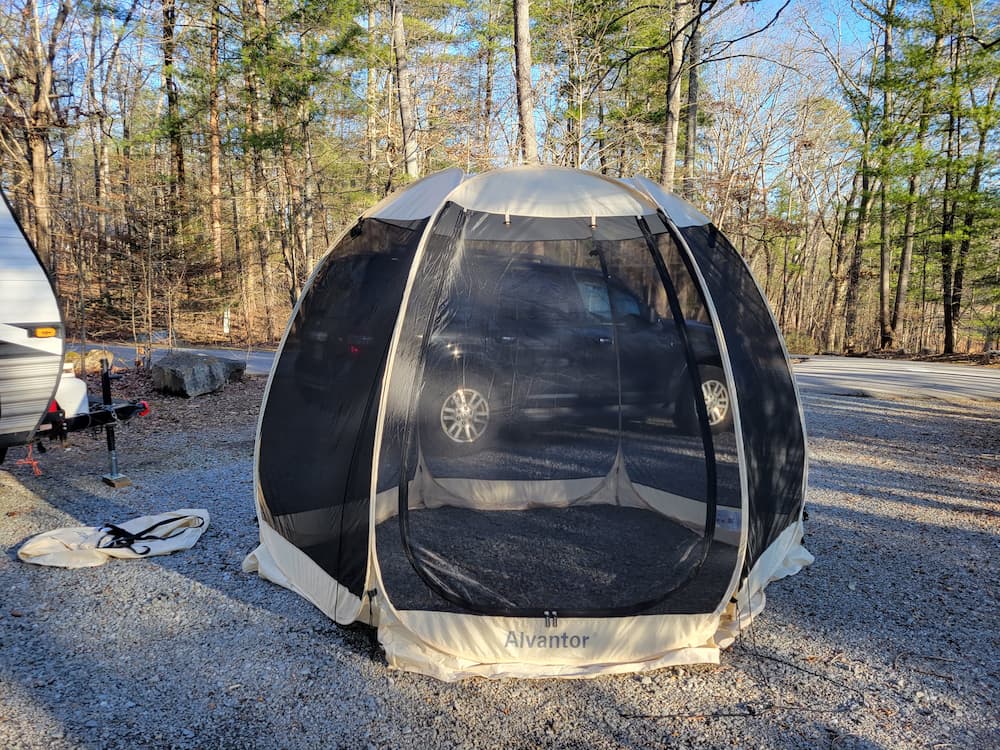
I love this thing!
Amazon Link: Alvantor Screen House
Outdoor Rug
Similar to the screen house, depending on where you end up setting up to camp, an outdoor rug can make a nice difference. I wanted something that would give us a little bit of room to breathe but it had to be light enough to roll up and easily pack.
I ended up getting a 9′ x 12′ reversible recycled plastic straw clearance rug. It does the job, it’s light, and I can fit it on the bumper after rolling it up.
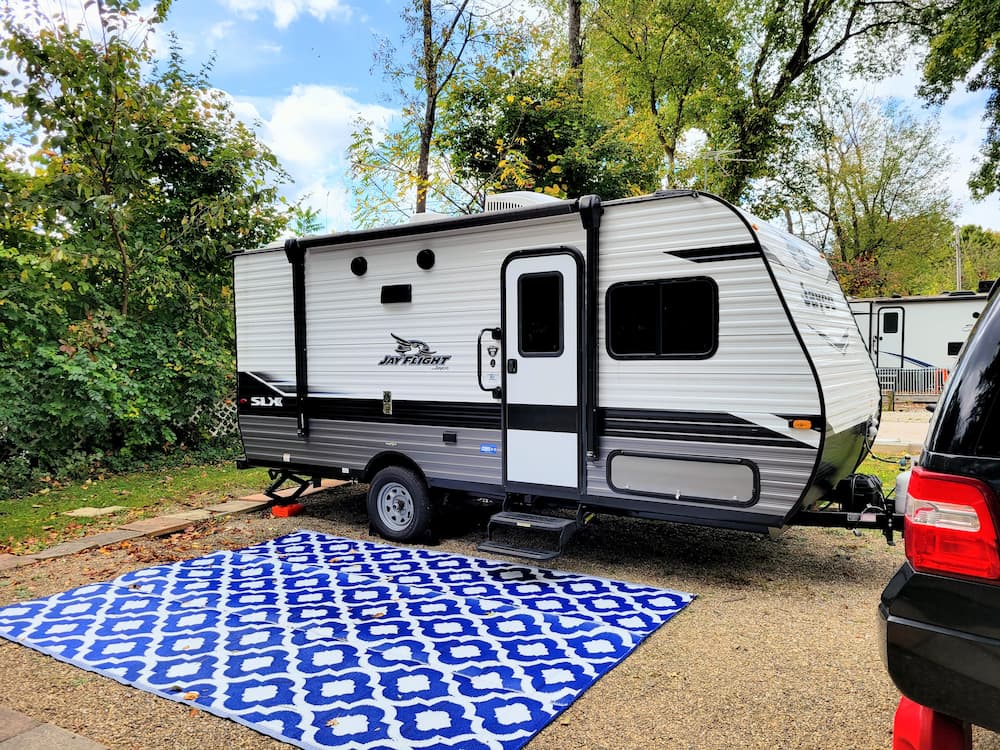
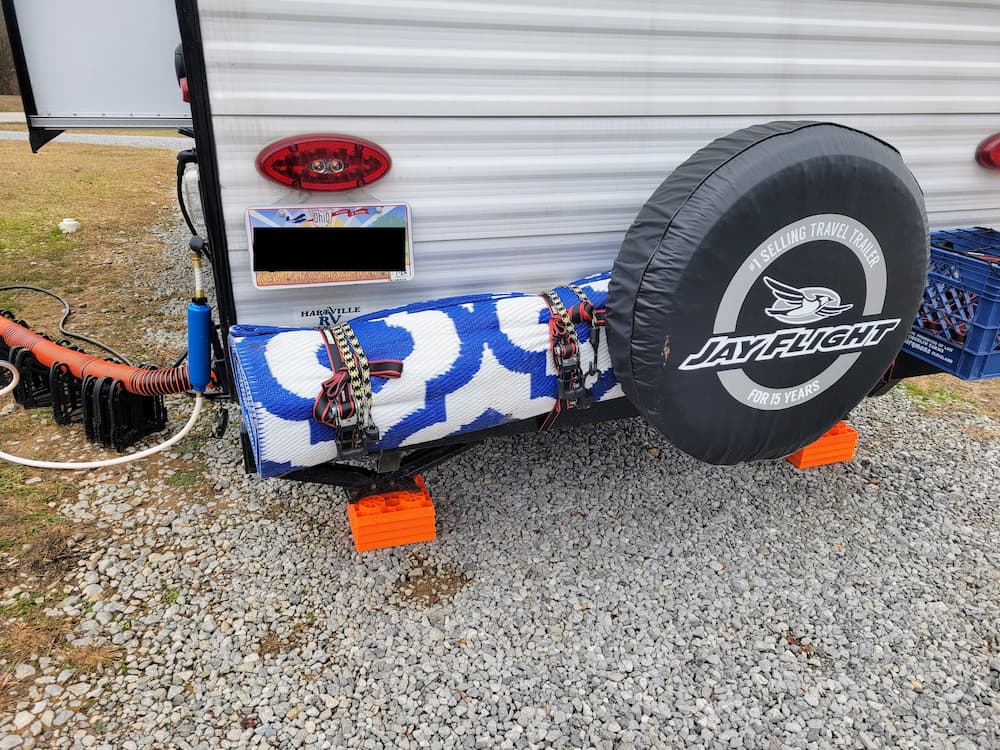
Amazon Link: Outdoor Rug
Telescoping Ladder
Our RV travel trailer is made by Jayco. Supposedly, they’ve got the best-in-class when it comes to roof strength. It’s supposed to be able to hold 3,000 pounds or something ridiculous like that (don’t quote me on that number!). Regardless, we wanted to be able to utilize that space as part of our grand RV adventure. Being able to sit on the roof at night and watch the stars sounds like a good plan!
Besides that, there are times when you’ll need to clean off the roof or the top of the slide. These are pretty hard to do without a ladder.
But our RV didn’t come with one. I could have just gotten a regular ladder but storage would have been tough. Instead, I decided on a telescoping ladder. It’s strong, versatile, and easily fits in the back of our Expedition.
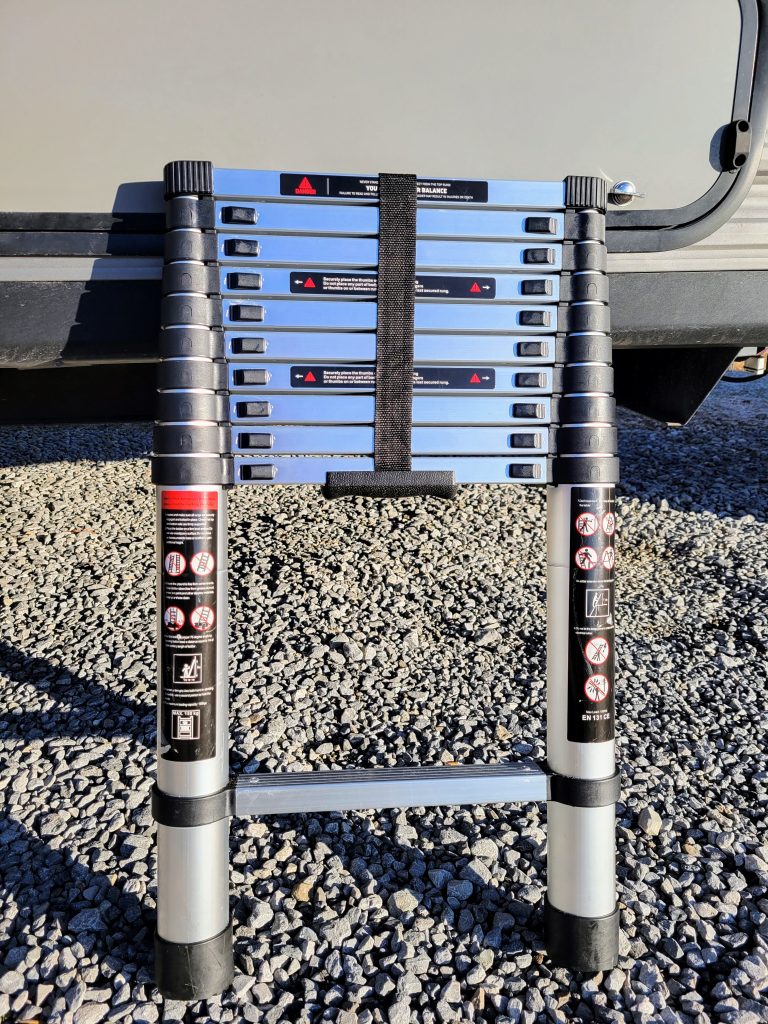
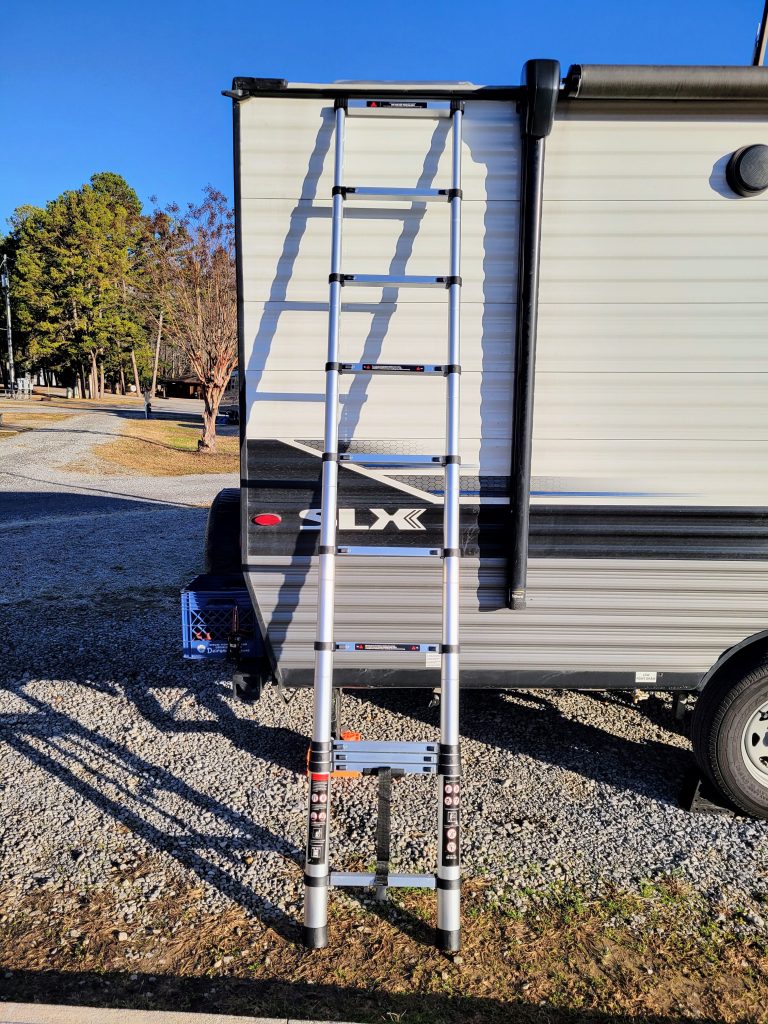
Amazon Link: Telescoping Ladder
Telescope
Well, we have a way onto the roof with the telescoping ladder, but we took it a step further. Faith had gotten a telescope for Christmas a couple of years ago, so we brought it along. We’ve only had an opportunity to use it for star-gazing once so far, but when our RV adventure takes us out west in a few months, I’m sure we’ll be using it a lot!

Amazon Link: Telescope
Cooking and Household
Pots and Pans Set with Detachable Handle
If you haven’t noticed the theme, space is limited in our RV. So finding a set of pots and pans with a releasable handle was like finding gold. We can store the pots and pans so much easier and the handle no longer becomes a protruding waste of space. It’s crazy how much of a difference a small detail like that can make!
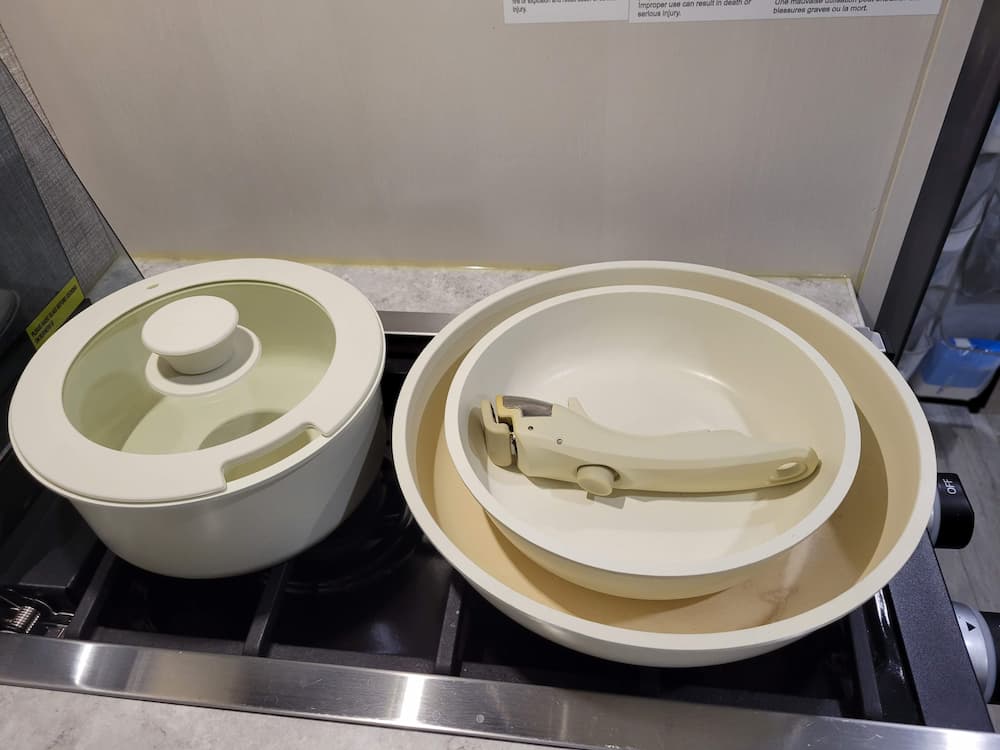

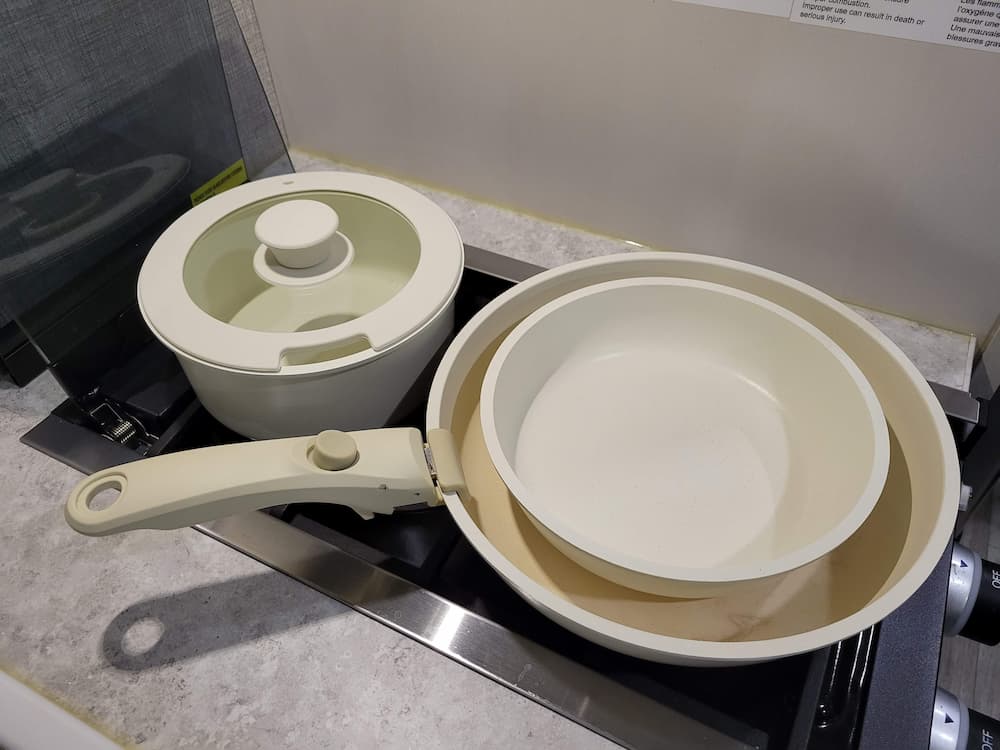
Amazon Link: Pots and Pans Set with Detachable Handle
Wheatstraw Dinnerware Set
As you might expect, you don’t want to bring your fancy china on an RV adventure across the country. Do people still have fancy china?
Anyway, we wanted plates, bowls, and cups that were versatile and wouldn’t rattle or break while traveling. We ended up getting a Wheatstraw dinnerware set that I won from a local auction. They’re light, durable, microwave-safe, and dishwasher-safe (not that we have a dishwasher in the RV)… they’ve been great for our road trip!

Amazon Link: Wheatstraw Dinner Set
Portable Blender
A full blender would probably be overkill for us. Plus, there’s a lot of time when we’re not hooked up to shore power to be able to use it. We found a portable blender online that runs off a battery and can be recharged with a USB cable.

Now, let’s get this out of the way right off the rip. This is not going to be making a batch of margaritas anytime soon. Blenders take a lot of power. This blender gets maybe 5 minutes on a charge. And it’s small, so we’re talking about making a single serving.
But when Lisa or Faith want to make a smoothie, it comes in handy for the job! It doesn’t have a lot of power and sometimes requires a little bit of help (mushing things up a little first) but it’s still useful for us.
Amazon Link: Portable Blender
Collapsible Bucket
I stumbled onto a collapsible bucket online when we were getting ready for this trip last year. It seemed useful and the price was right so I bought it. It turned out to be so useful that we’ve since ordered a second one.
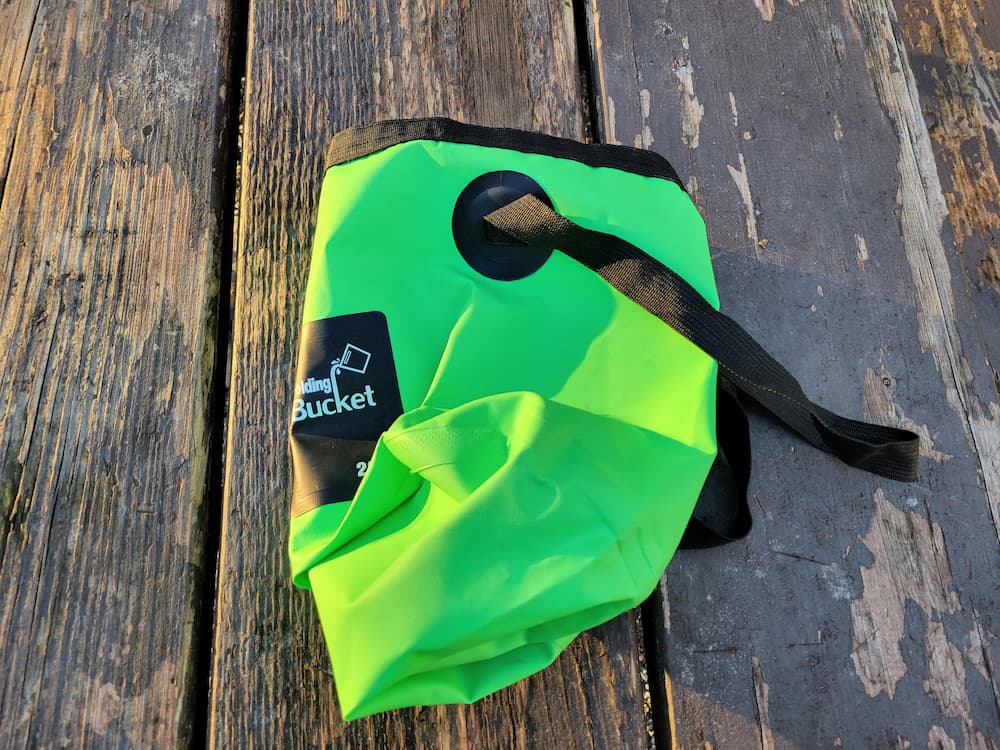

It takes up virtually no space and works very well when you need it. And it’s 20 liters (5.28 gallons)!
Amazon Link: Collapsible Bucket or 2-Pack Collapsible Buckets
Insect Screens for RV Vents
The vents for your furnace and water heater are great places for bugs to make a home or build a nest. You can’t cover them up either so what do you do?
They make metal screens that go over these vents in your RV so you can block out most bugs while still keeping the vents open for business. I will say, the tool they provided to do this was useless for me. I ended up using needle-nose pliers to hook the screens on and got the job done so much easier.
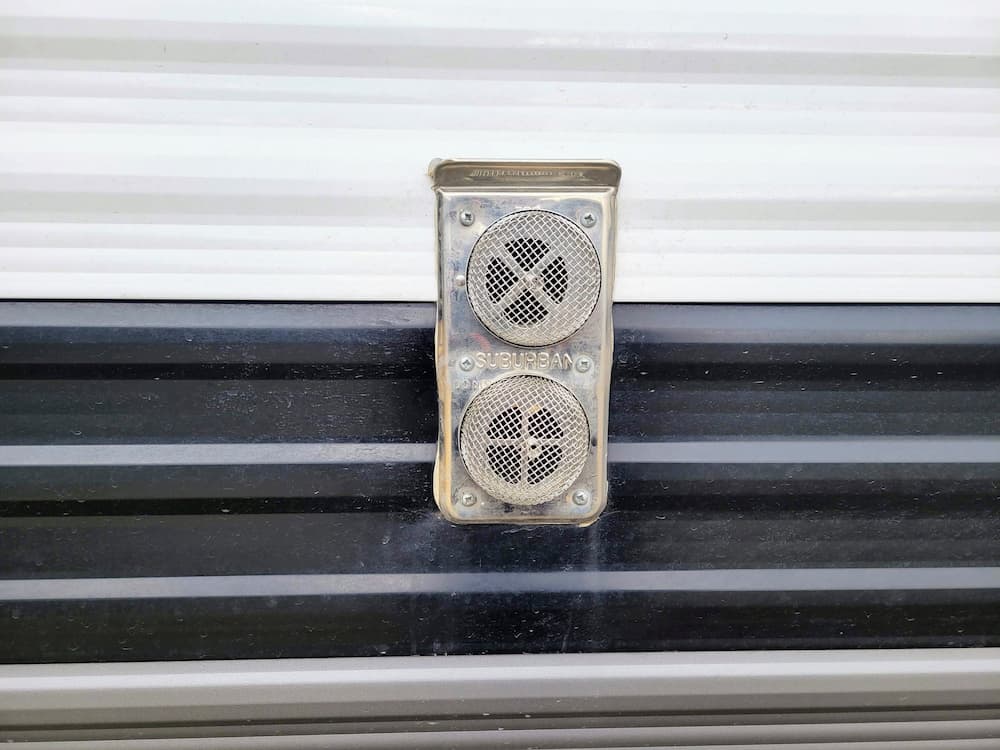
Amazon Link: Insect Screens for RV Vents
Collapsible wagon
This one might be debatable and we haven’t used it yet, but let’s talk about it. I bought a collapsible wagon that we used a ridiculous amount of times before this RV adventure. But I brought it along with the idea that when we need to do laundry at an RV park’s facility, for instance, we can use it to tote back and forth across the park. There are a million other “and maybe…” scenarios, too.
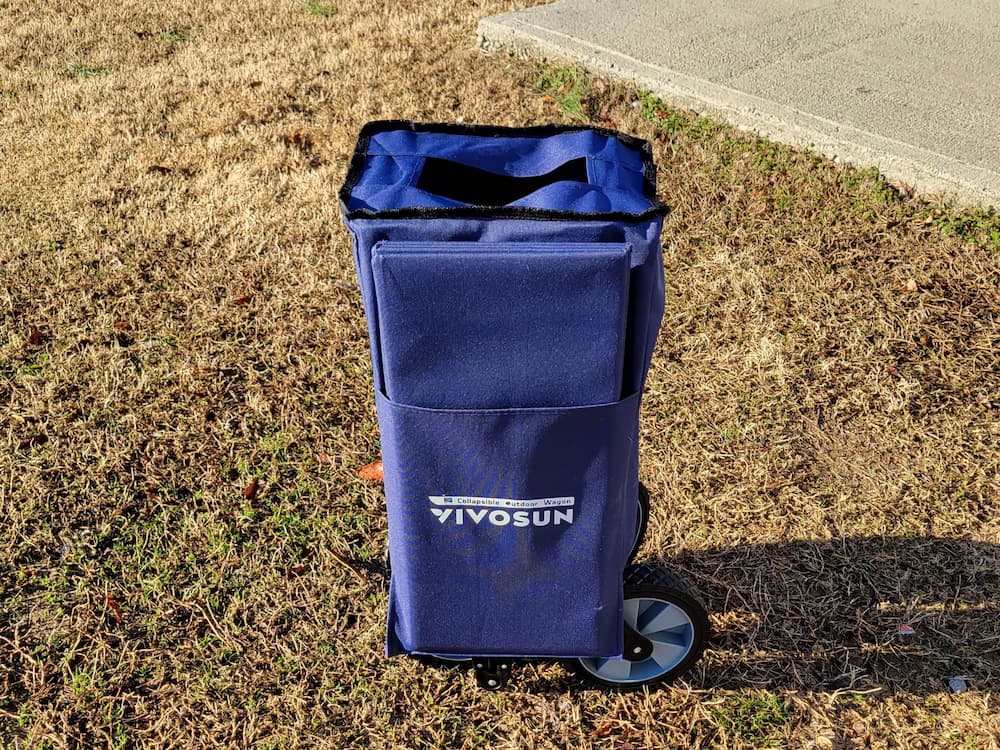

But, we have yet to use it and it’s currently taking up space in our Expedition. The timing has just worked out well for us where we seem to either be visiting with someone who lets us do laundry at their house or we’re parked right by the laundry room at a park. Can’t complain about that!
So, we’ll see. I still feel like it’s good to have “just in case” but right now it just seems to be a waste of space.
Amazon Link: Collapsible Wagon
Internet
Calyx Institute Hotspot
I won’t dive into this too much since I already wrote a post all about the subject (The Calyx Institute: Our Secret to Inexpensive, Unlimited, Unthrottled Internet on the Road), but having internet access is important for us on this trip across the country.
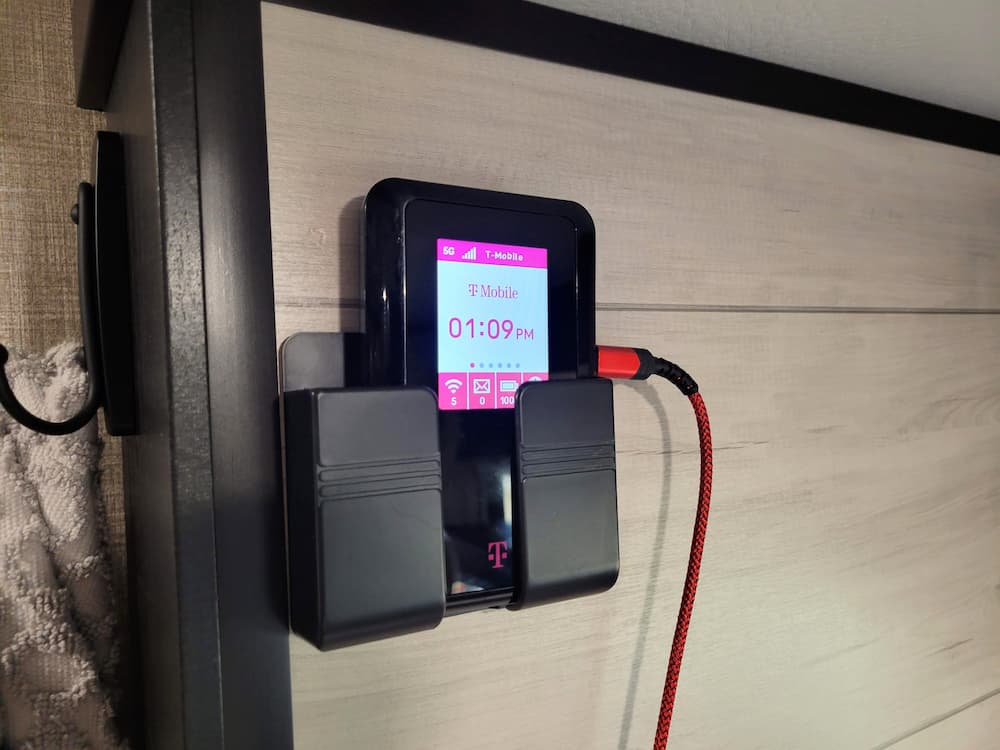
This hotspot gives us truly unlimited and unthrottled internet for less than we were paying per month for internet at home. It’s also a better move than using the home internet from Verizon or T-Mobile for reasons I talk about in my post.
The hotspot from the Calyx Insitute has been great for us both while on the road driving and wherever we set up camp (as long as there’s a cell signal).
My Post on the Hotspot: The Calyx Institute: Our Secret to Inexpensive, Unlimited, Unthrottled Internet on the Road
Direct Link for One Month Free: Calyx Institute
RV Campground Memberships
Ok, these technically aren’t “items” or “products” for your trip, but they still fit in well when deciding what’s needed.
We’re still experimenting with these, but these are the memberships we joined as needed and they’re already paying for themselves. By the time this RV adventure is finished, we’ll have made out like bandits!
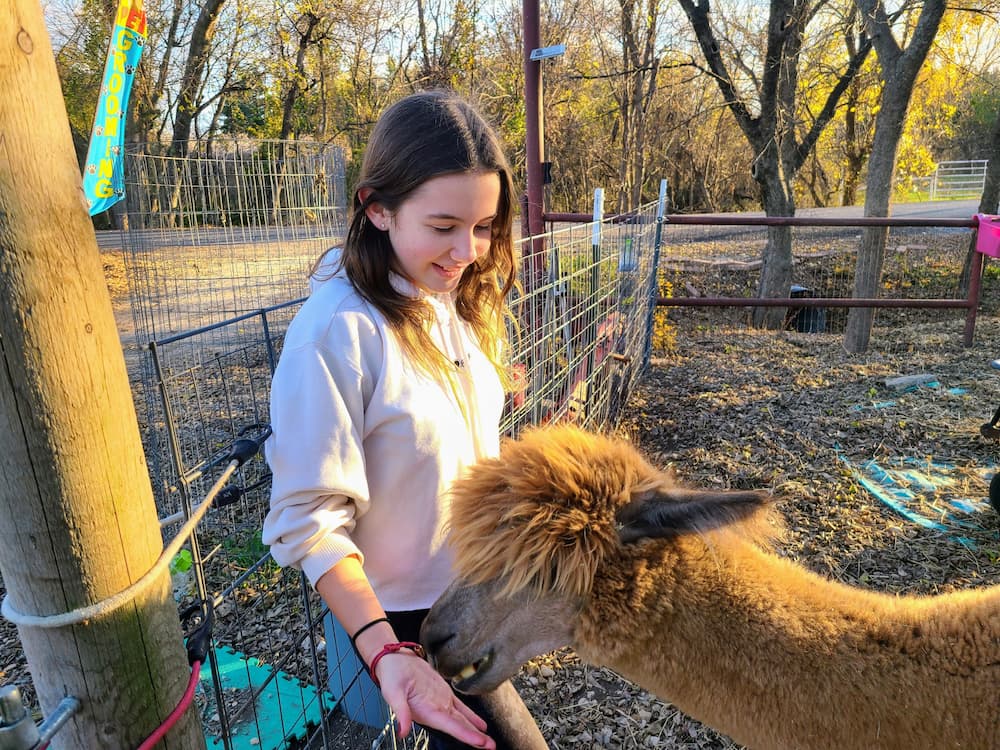
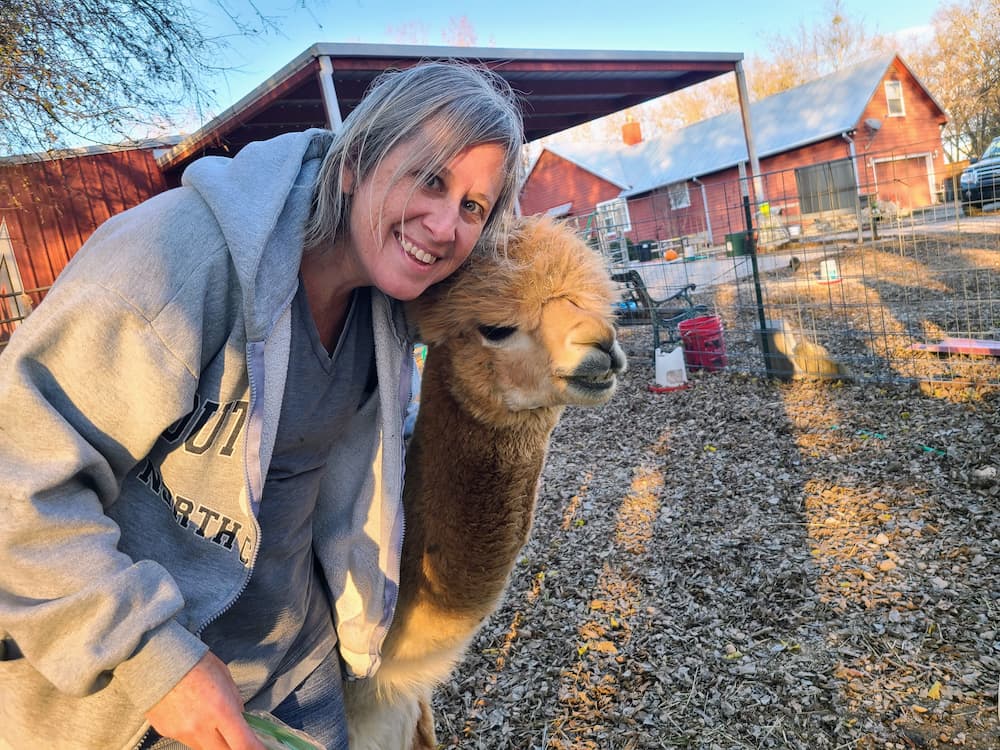
Harvest Hosts / Boondockers Welcome
Harvest Hosts and Boondockers Welcome offer a different experience when you just need a place to stay for a night instead of a Cracker Barrel or Walmart parking lot.
Harvest Hosts partners with breweries, wineries, farms, museums, and a ton of other businesses. The idea is that they allow you to stay overnight (usually a 1-night max) and you show your appreciation by patronizing their business.
We’ve only done one of these so far… we stayed at an alpaca farm for a night. Faith and Lisa are animal lovers so this was something unique, fun, and really cool.
Boondockers Welcome is the other half of the membership (you can sign up for either one or both) and it’s different in that it’s almost always other RV folks giving back to the community and offering up space they have for a night. In some cases, they’ll offer a connection for electricity or even water.
This is a great opportunity to meet others in the community when you need a place for the night.
Direct Link for 30% Off: Harvest Hosts
Link: Boondockers Welcome
Hint: I signed up for Harvest Hosts by itself and was immediately offered a nice discount to join Boondockers Welcome as well, which I did.
Passport America
This has been our biggest money saver so far and paid for itself on the first use. The slogan is “The Original and World’s Largest 50% Discount Camping Network” and that’s exactly what they provide.
There can be stipulations like maybe it’s only applicable toward the first night or two of your stay, but it’s usually still a great deal if you can find a place you want to go.
We’ve used this on two to three stays so far and it saved us a ton of dough!
Link: Passport America
Good Sam
Everyone seems to be a Good Sam member but we didn’t initially get a membership because we just weren’t hitting RV parks that seemed to be part of the network. That’s unusual because Good Sam seems to be one of the most common discounts offered at parks.
Once we did start booking at a couple of these parks, we signed up to become members. This one hasn’t paid for itself yet, but there’s no doubt we’ll come out ahead by the time our RV adventure wraps up later this year.
Link: Good Sam
Looking at all these things might make you think that we spent a fortune on this RV adventure. It certainly wasn’t cheap. However, I’m pretty thrifty and I bought a lot of these items on Temu for a fraction of the cost (get 30% when you sign up with this link). I also got a lot of items from a local auction house that auctions overstock merchandise and returns from Amazon, Target, etc. It was only when I didn’t find the things there that I turned to places like Amazon and Walmart. Harbor Freight was a good resource for some things as well!
If you found this post interesting, please consider jumping on the mailing list. I’ll even send you a welcome email with a bunch of cool useful spreadsheet tools I’ve created just because you’re so awesome…
Here’s to a great RV adventure of your own – cheers!
To read about our whole RV adventure, here are the related posts from start to finish…
- You Gotta Spend Money To Make Money, Right? Our Monster Travel Experiment
- Adventure Planning: I’ve Made This Mistake Twice
- RV Boondocking: Spending a Little Money on 3 Changes Now to Reap Huge Savings and Enjoy a Better Trip Later
- It’s Amazing What Being Alone With Your Thoughts on a Walk Can Do for You
- The Calyx Institute: Our Secret to Inexpensive, Unlimited, Unthrottled Internet on the Road
- The Ups and Downs of RV Life: 45 Days in Our Tiny Home
- Our 9-Month RV Adventure: The 55+ Essential Items We Bought for the Road
- Our RV Trip Was Quickly Becoming a Florida Flop… Until We Shifted Gears
- The World’s Largest What??!! 7 Months of Our RV Road Trip Complete, 1 To Go!
- 8 Months and 13,409 Miles Later: Our RV Adventure is Over
Plan well, take action, and live your best life!
Thanks for reading!!
— Jim
Dang Jim, this post really helped cause I really needed a water pressure regulator, but didn’t realize it until I saw your post. I’m going to be sucking water out of my pond to water plants this summer and gunna need the water to not be 10,000 PSI when it comes out, so thanks! Safe travels sir!
Haha, strange way I could help but glad I could! 🙂 Good luck on the pond – that sounds like a great idea way to do it!
Great Content! I am going to buy my husband some of the items mentioned.
We do not have an RV???? but he’s gonna love the collapsible buckets, propane valve, water pressure tool.
Greetings from South Carolina
Thanks, Paula – yeah, those buckets are really handy! It’s one of those things you don’t realize you need until you see it! 🙂
This is a great post! As a full-time RV household, I found some things on your list that could help us with some problems we’ve encountered. I enjoy reading your posts, so please keep it up.
Oh, good – so glad to hear that, Ivy! Enjoy the RV life!
Wow, what an epic post! We’ve been RV’ing for years and I still found some handy tips! Thanks for all of the work putting this together – a valuable resource for anyone who is, or is considering, RV’ing!
A heckuva lot of work to put this together (a lot more than I thought) but I think it turned out well… thanks, Fritz!